- Features
- Our Hometown Platform Overview
- iOS and Android Apps
- Social Media Autopost
- Audio Articles
- Customer Support
- Get Started
- Current Customers
- About Us
- Account
Automate Social Sharing with FS Poster
If you’re looking for a way to streamline your social media sharing process, FS-Poster is an excellent tool to consider. This WordPress plugin enables you to automatically share your blog posts, pages, and custom post types on various social media platforms, such as Facebook, Twitter, LinkedIn, Instagram, and more. With FS-Poster, you can save time, increase your reach, and engage your audience without having to manually post on each platform separately. In this tutorial, we’ll show you how to use FS-Poster to share your WordPress content on social media, step by step. Let’s get started!
Getting Started
with FS Poster
with FS Poster
Getting Started
with FS Poster
What do you want to share?
With FS Poster, you can share different types of content, including:
- Blog Posts: You can automatically share your blog posts to social media platforms like Facebook, Twitter, LinkedIn, Instagram, Pinterest, and more. FS Poster can generate a post excerpt, add a featured image, and include a link to your blog post.
- Custom Messages: FS Poster enables you to create custom messages to share on social media. These messages can include text, hashtags, and mentions.
- Images: You can share images directly from your WordPress media library to social media platforms. FS Poster allows you to add captions, descriptions, and hashtags to your images.
- Videos: FS Poster supports sharing videos from platforms like YouTube, Vimeo, and Dailymotion. You can automatically post video content to your social media accounts.
- Events: If you’re organizing events through plugins like The Events Calendar, FS Poster can share event details, including the event title, date, time, location, and description.
To which platforms do you want to share?
The FS Poster plugin can share content to a variety of social media platforms, including:
When do you want to share?
The FS Poster plugin offers several scheduling options to automate the sharing of content on social media. Here are the types of scheduling available:
- Immediate Posting: Share your content immediately with a single click.
- Specific Date and Time: Schedule your posts to be shared at a specific date and time in the future. You can choose the exact date and time for each post.
- Recurring Posting: Set up recurring schedules to automatically share your content at specific intervals. You can choose daily, weekly, or monthly recurrence patterns.
- Delayed Posting: Add a delay between the time of content creation and the time of posting. This feature allows you to create content in advance and have it automatically shared after a specified delay.
- Intelligent Auto-Scheduling: Let FS Poster automatically determine the best times to share your content based on audience engagement patterns. This feature utilizes algorithms to optimize the timing of your posts.
Initial Settings
General and Publish Settings
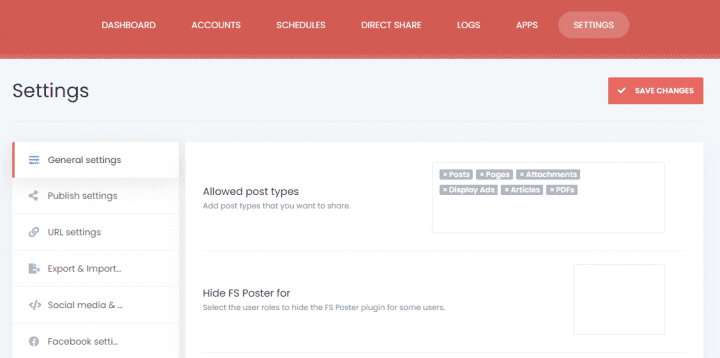
First we need to add the post types that we would like to share through FS Poster. In particular under the General Settings tab we need to add Articles and PDFs to the allowed post types.
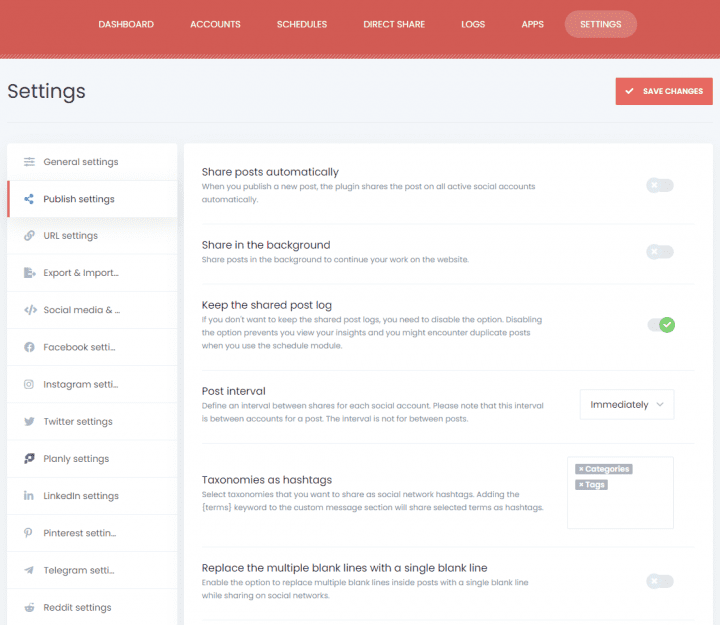
One of the most useful way to share with FS Poster is via schedules. and as such will be disabling the auto publish option, making sure posts on only shared via the scheduler.
The other important setting on in this section is for those wanting to utilize hashtags on their social media posts. You can add taxonomies that will be used as hashtags upon sharing, tags and categories being the most common.
URL Settings
It is a good idea to customize how URL are shared by the FS Poster plugin, as by default it includes extra info beyond just the post link. The setup is different if your website hosts a single publication or multiple.
Single Publication Website
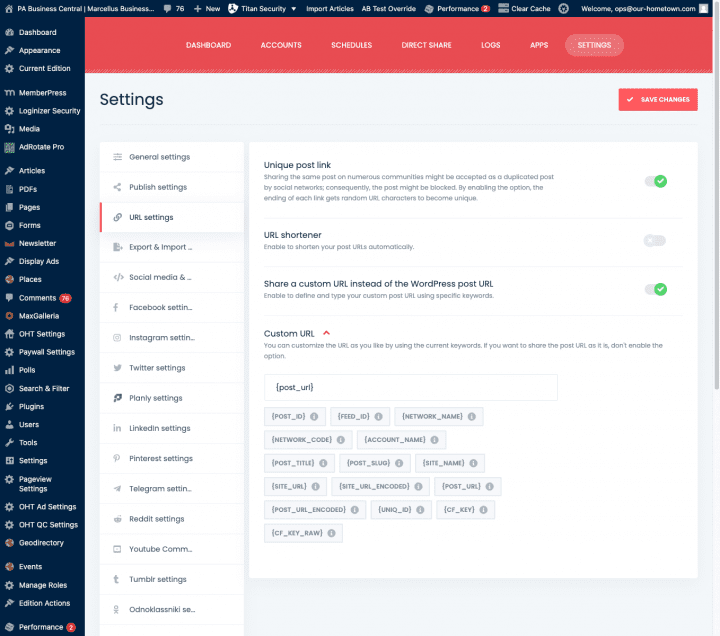
Go to the URL Settings tab and toggle on the Share a custom URL instead of the WordPress post URL.
Then twirl down the arrow next to Custom URL and for most common uses we will delete everything in the text field and just place the post URL token by clicking on its button.
Multi-Publication Website
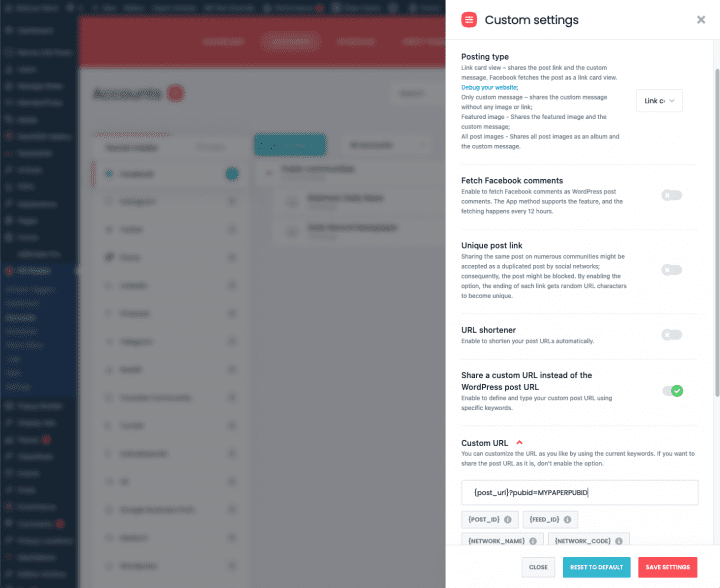
If you are running a multi-publication site on our platform the process is slightly different. Instead of changing the default URL configuration in the main Settings tab, we will be specifying the custom URL setting at the account level.
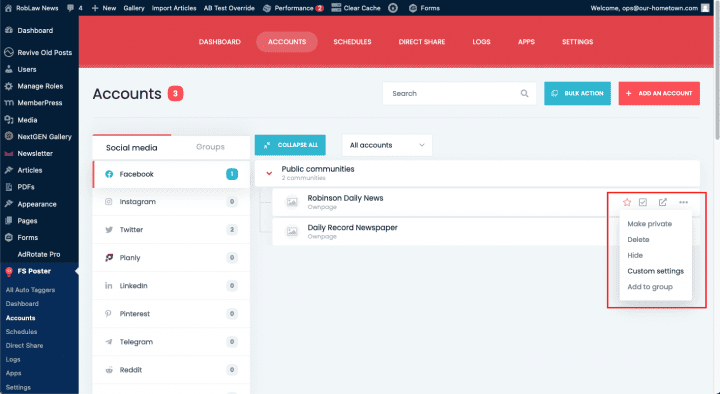
From the Accounts tab click on the three-dot menu to the right of the account listing and choose Custom setting.
Scroll down and toggle on the Share a custom URL instead of the WordPress post URL option.
Delete the default tokens and place the {POST_URL} token into the field followed by the paper ID in the following format so that the field contains:
{post_url}?pubid=MYPAPERPUBID
Simply substitute the correct paper ID and it will be added to the shared link allowing for URLs shared via the plugin to correctly link back to your website. The simplest way to verify your paper id is to refer to the URL of an article on your website, where you will find it appended at the end. For example, https://restorationnewsmedia.com/articles/wilsontimes/as-school-closes-teachers-and-students-look-ahead/?pub=wilsontimes
Finally click Save Settings to commit the change.
Facebook Settings
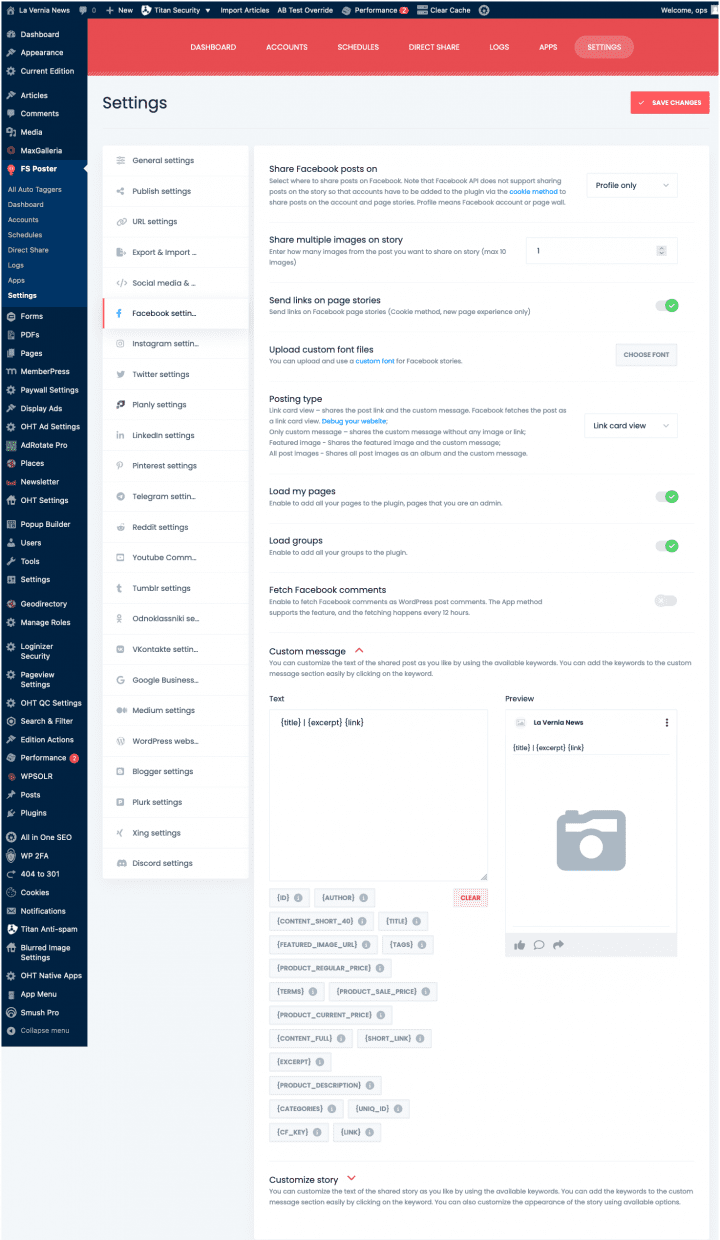
The default customization for each individual platform shares many aspects, so we will start with Facebook as a baseline. Note will be used for any shares generated by the scheduler, and can be overridden when sharing a post manually.
The plugin offers the following options for customizing Facebook posts:
You can choose where to share Facebook posts: on your Profile, on your Story, or both. Posting to a profile allows you to share to any pages or groups managed by that account. These settings should be toggled on.
There are several post formats to choose from:
- Link card view – shares the post link and the custom message. Facebook fetches the post as a link card view.
- Only custom message – shares the custom message without any image or link;
- Featured image – Shares the featured image and the custom message;
- All post images – Shares all post images as an album and the custom message.
It is very important to toggle on Load my pages and Load groups so that you can share to all the pages and groups that you manage via your Facebook account.
Custom Message
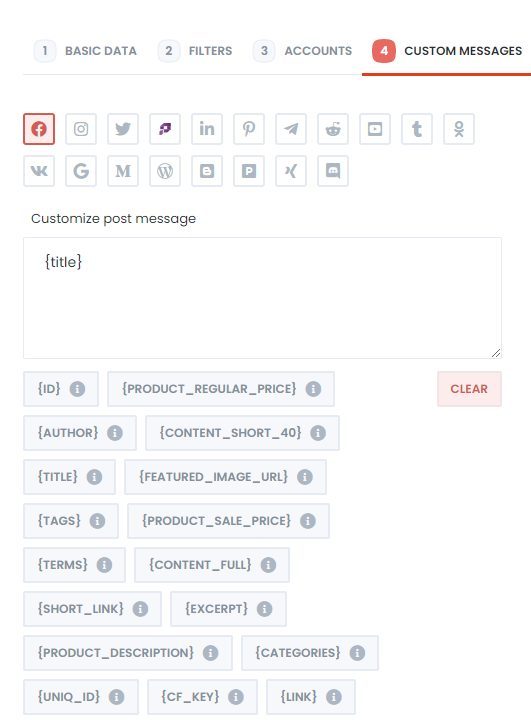
You can add a custom message to your Facebook post, which will appear alongside the image. Twirl down the Custom message pane and you will see a text field, a set of dynamic placeholders, and a rudimentary preview of the post.
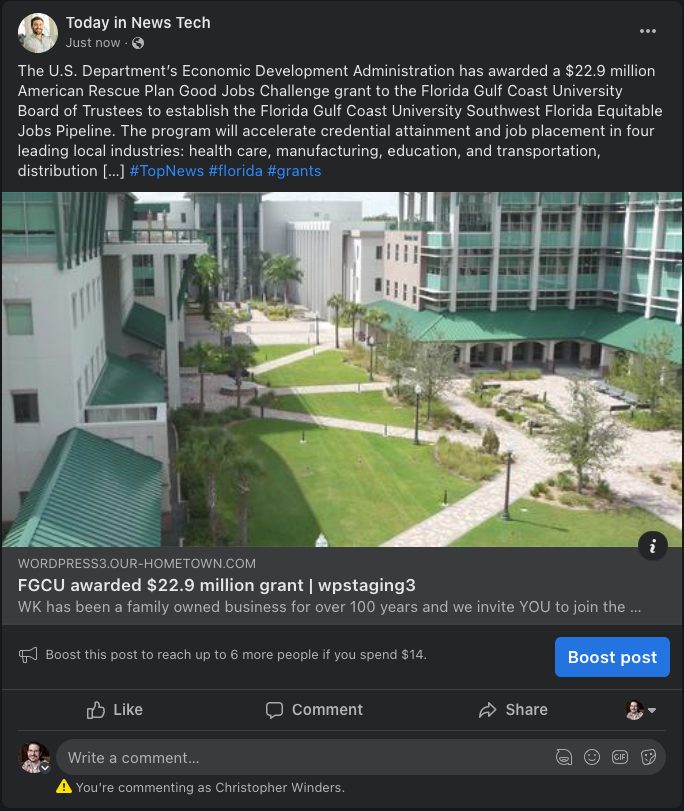
The placeholders are excellent for adding additional metadata to a post beyond just its content. For instance as mentioned before under Publish settings, you can assign WordPress taxonomies, such as categories or tags, to be used as hashtags in the custom text of a post by using the {TERMS} placeholder. Another very useful placeholder is {EXCERPT} which will add the excerpt from your article to the shared post.
Below is a Facebook share using the excerpt and terms placeholders.
Adding Social Accounts
Overview
FS-Poster can have unlimited accounts in the plugin. Connecting the account is fairly straightforward. In general, it is better to use the app method instead of the cookie method.
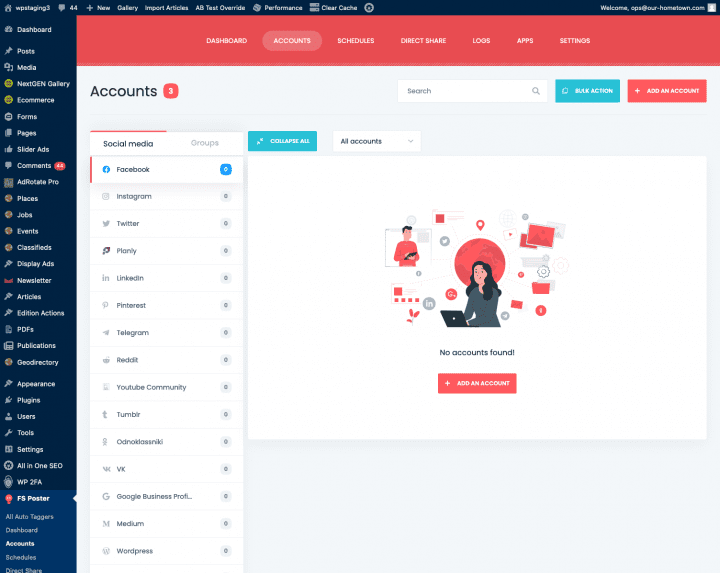
From the Accounts Tab click on the Platform in the list to the left then the Add an Account button to bring up the Account Setup panel.
The method for adding additional accounts will vary by platform, but is generally the same, supply credentials and select which pages or groups you would like to manage.
Additionally, the process of logging into the various platforms is simplified greatly (regarding the various security steps), if you have recently logged into those accounts from the same browser.
Facebook
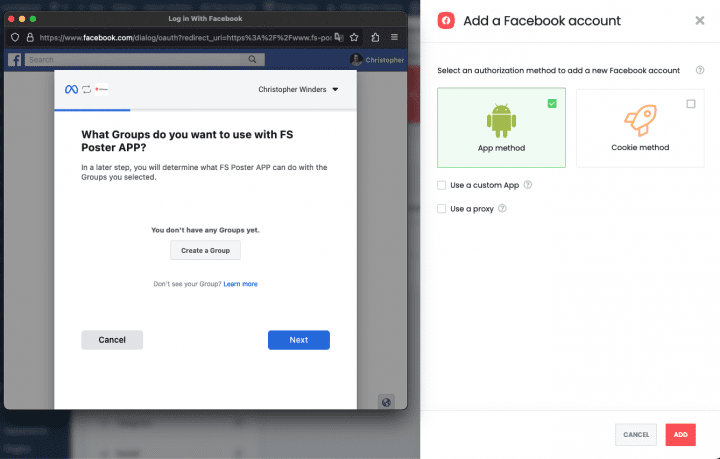
After selecting a platform from the list on the left (we will demonstrate Facebook as it if representative of the process for many of the other platforms), click the Add An Account button to bring up the Add Account Panel.
The authorization method should be left at the default of App method for nearly all cases.
Click the Add button to bring up a pop-up window prompting you to enter your Facebook credentials.
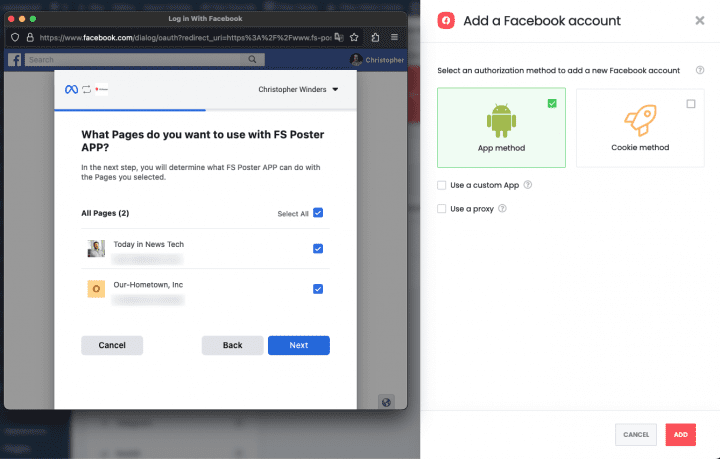
After logging in, if you have the Load Pages and Load groups options toggled on in your general Facebook settings, you will then be asked to choose which pages or groups you manage that will be available to the plugin.
And finally confirm the access permission by clicking Done and your account has now been added. Back on the account page you will see a list including your profile and any pages or groups you manage.
Account Groups
Account groups can facilitate the management of multiple social media accounts across different platforms. This means that you can manage, schedule, and publish posts to different accounts in an organized manner.
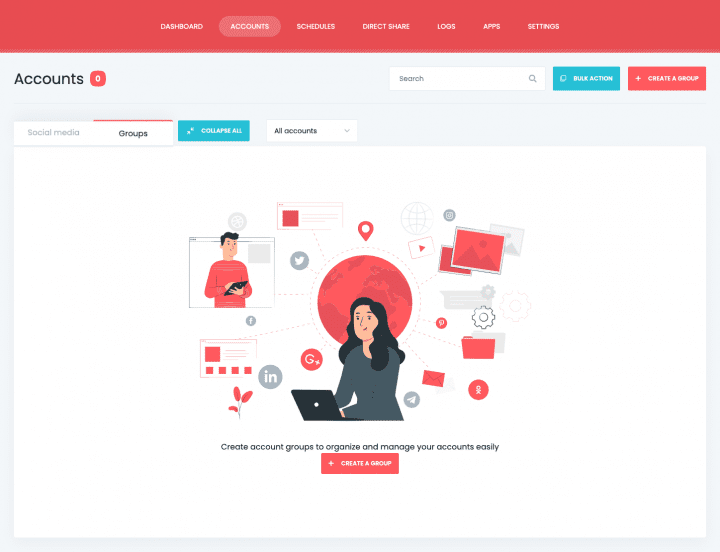
On the accounts page click on the Groups tab, and click the Create A Group button.
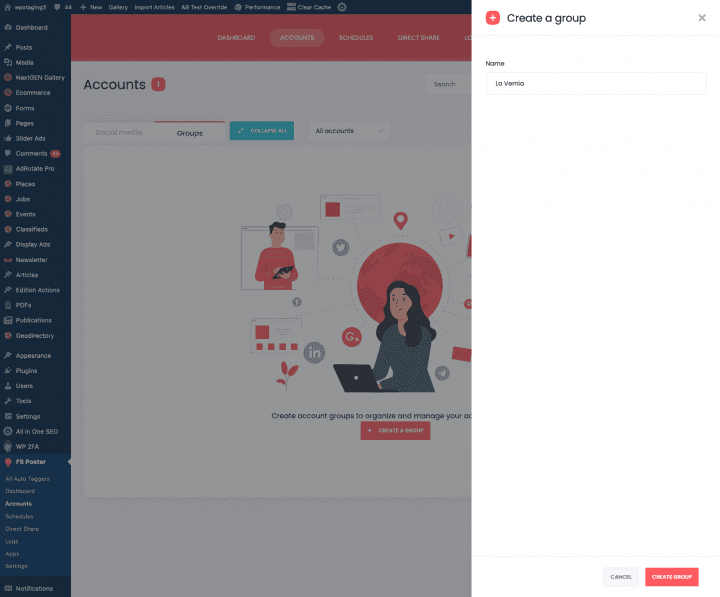
A new panel will appear where you should give the group a descriptive name. This is extremely helpful for our publishers managing multi-paper websites where you can share to a group of accounts representing a single publication or community.
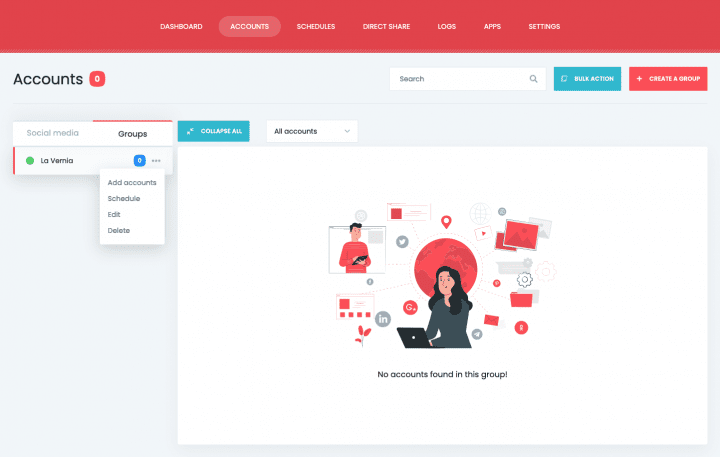
Click Create Group, then Done to go back to the Groups list. To the right of the newly created group, click on the 3 dots to bring up the settings menu, the first of which is Add Accounts.
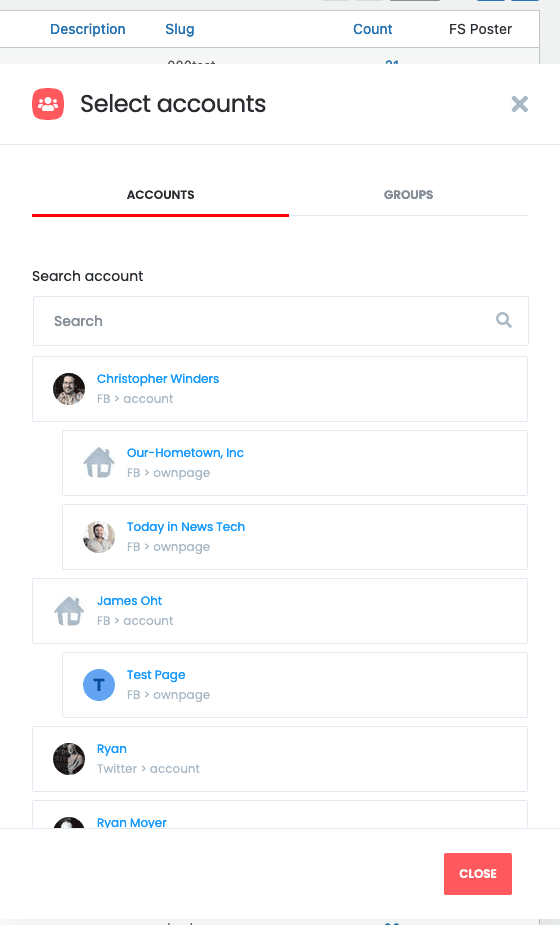
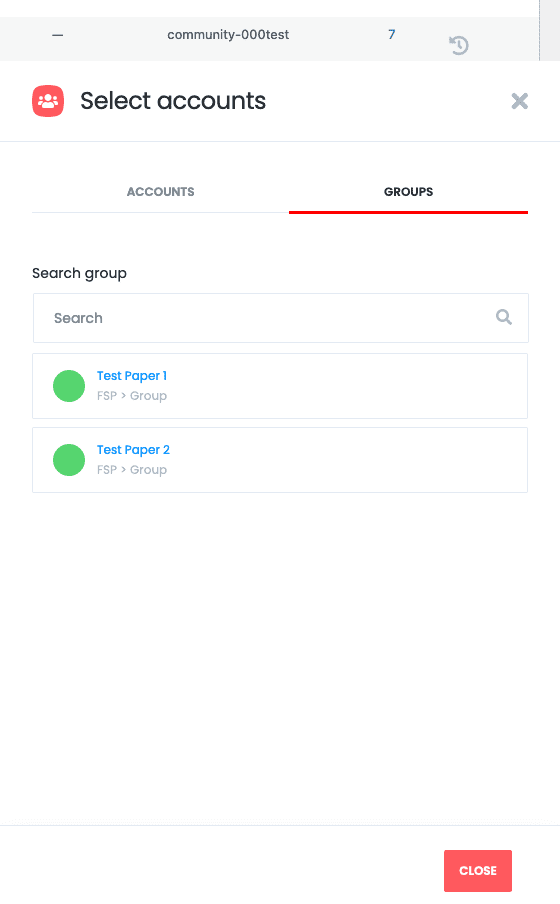
A new panel will appear with a listing of all social accounts that have been authorized in the plugin. Choose the accounts to include, then click Close.
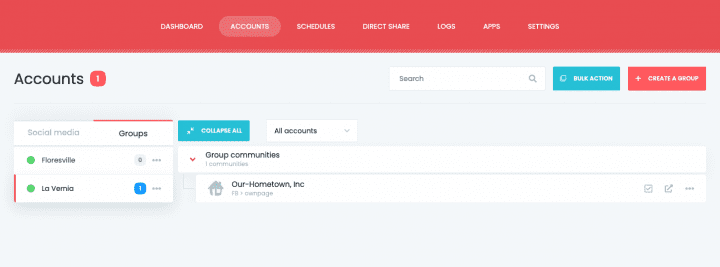
Your accounts will now appear in the group list when a particular group is selected from the list on the left.
Groups can be selected instead of individual accounts on any of the settings panels where accounts are specified, be that schedules, post shares, or direct shares.
Activation and Permissions
Each account and its associated pages or groups need to be activated in order for the plugin to being sharing. This also allows you to temporarily disable sharing to a particular target platform or page.
To activate an account you can simply click on the checkbox to the right of the listing or via the 3-dot menu to the right of that.
In addition to allowing you to activate an account, you can choose to activate an account for all authorized users or users via condition that collaborate on your website. This means that they can share to those accounts from their own schedules or posts.
The name of the platform on the accounts page will now have a green dot indicating that it contains active share targets, such as a group or page.
Using Schedules
Schedule by Tag
Our team has extended the base FS Poster plugin with a auto tagging feature. The plugin already allows filtering by tag, but we wanted a more comprehensive way to manage how tags are attached to posts for sharing purposes.
In essence, the Auto Tagger functions as a collection of Categories. The plugin normally only allows you to select a single tag or category per schedule. The Auto Tagger bypasses this limitation.
You will find the Auto Tagger in the FS Poster menu on the admin dashboard.
This page lists all the Auto Taggers that you create within the FS Poster plugin. You can have as many taggers as you would like, each collating a subset of article categories for use with a FS Poster Schedule. You can use a single tagger for multiple schedules, however a schedule can use only one.
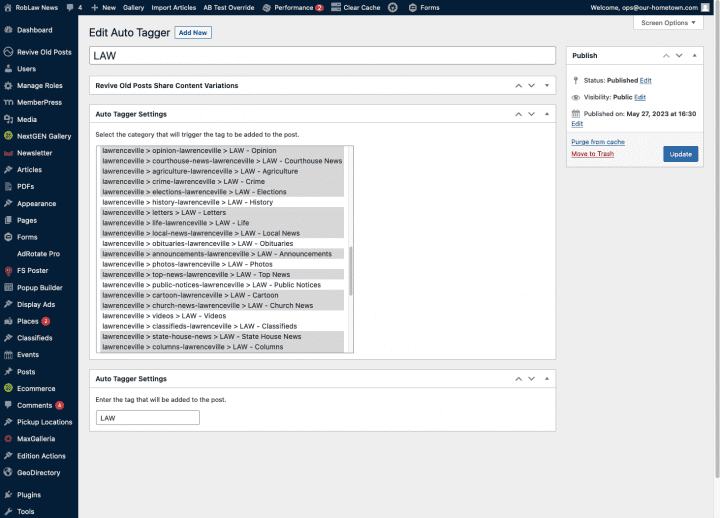
Click the Add New button to create a new Auto Tagger.
The settings for each tagger are simply which Categories should receive the tag and give the tag a relevant and useful name for what it represents.
In this case thus customer wants to simply tag all the stories from the main categories of the site and have a schedule share the posts throughout the week.
Once the Auto Tagger has been created, any future articles published to the selected category will automatically receive the tag name you specified.
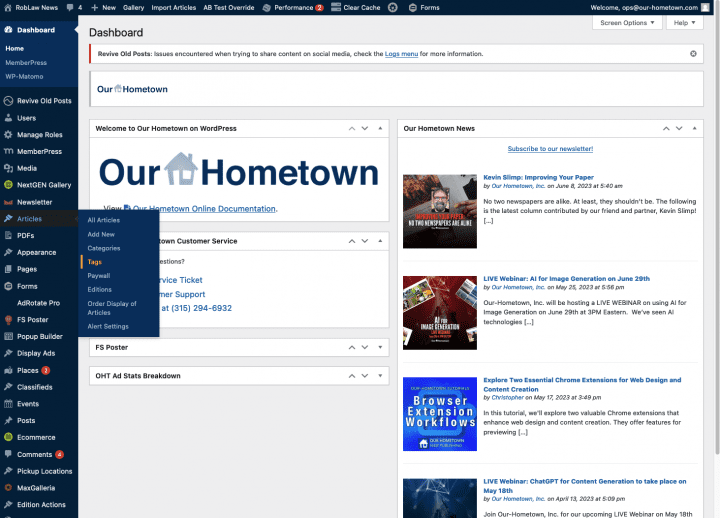
In addition the new tag it will appear under Articles, then Tags.
Click on the clock icon to create a new schedule. Note you can select these tags directly in the filter tab of the Add New Schedule panel as well.
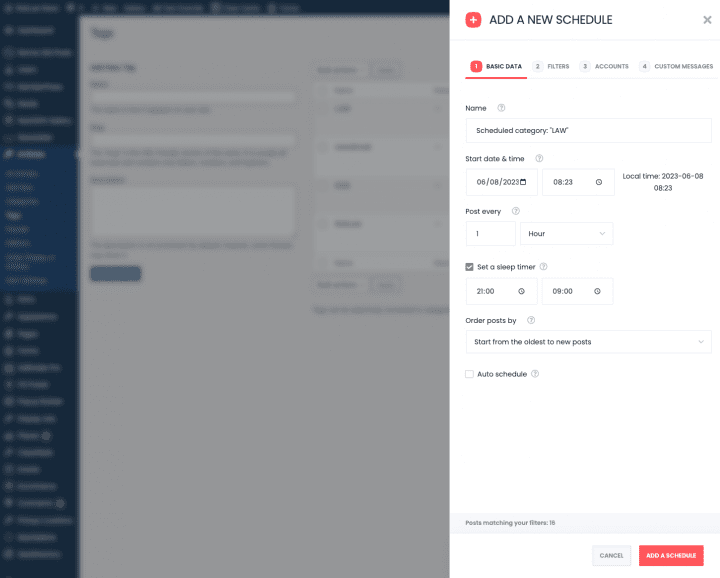
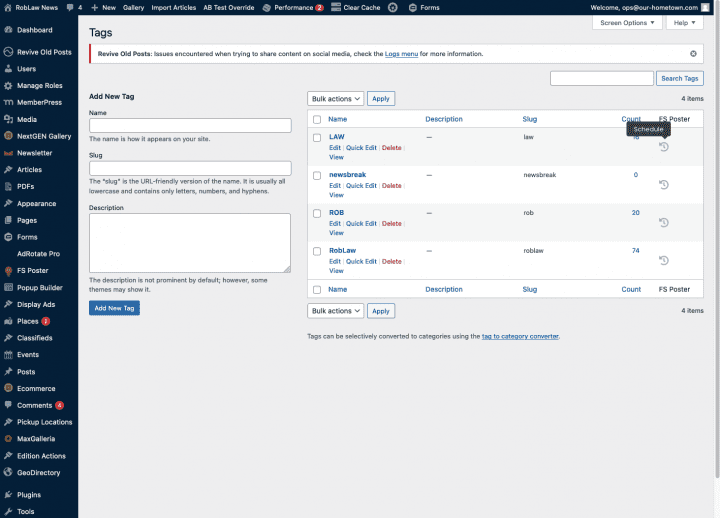 An overlay where you can create a new schedule of that particular tag will slide in from the left. The first tab is where you set the Basic Data for the schedule.
- Rename the Schedule to something you can easily identify.
- Start date will likely not need editing
- Edit the Post Every setting to the desired interval.
- Set “Quiet Hours” with the sleep timer setting. You will probably want to use this to ensure that the schedule is not constantly posting all night.
- IMPORTANT – set the order posts by setting to “Start from the oldest to new posts.” Without this, the schedule will finish, and eventually stop running. NOTE: This option will not appear until you complete the setup on the Filters tab explained below.
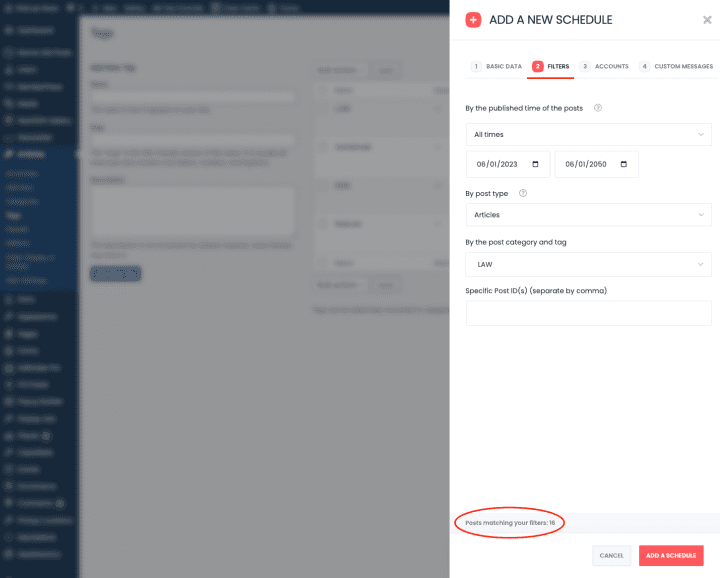
The second tab, Filters, is where you specify which content should be shared by the schedule.
- Select the date range for the posts. Be sure to set the end date into the distant future (example: 12/07/2036)
- Select Articles for the post type
- The Category should already be selected – look at the count at the bottom “Posts matching your filters: X” to ensure you have the category setup correctly. If the number seems excessive, or too low, check the date range first. Otherwise, you may have the wrong category selected.
 You can now return to the Basic tab and specify the order of posts by setting to “Start from the oldest to new posts.”
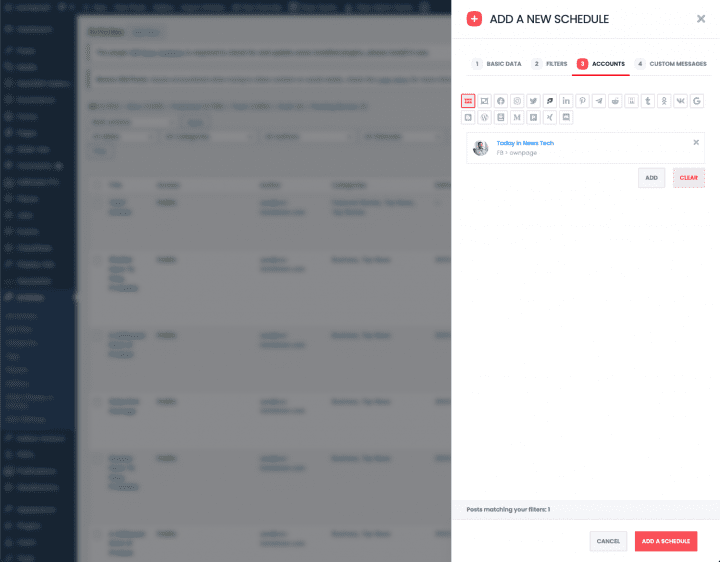
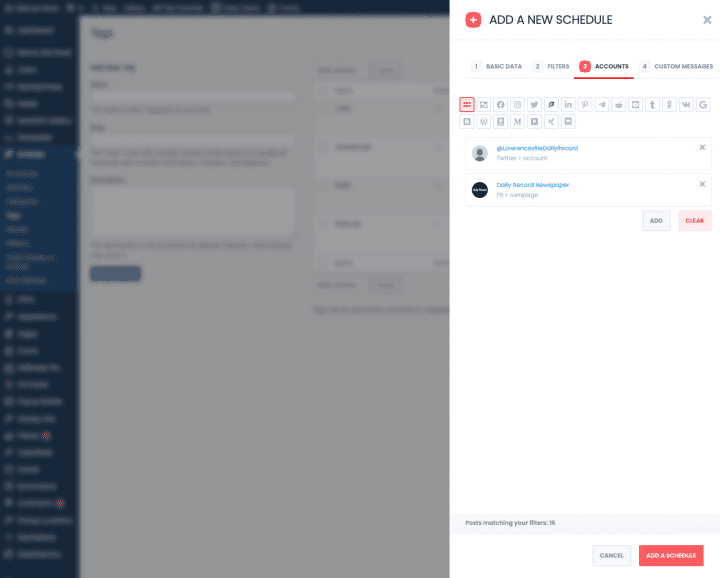
Next go to the third tab, Accounts, and select “Add” to select the account, multiple accounts or a group of accounts.
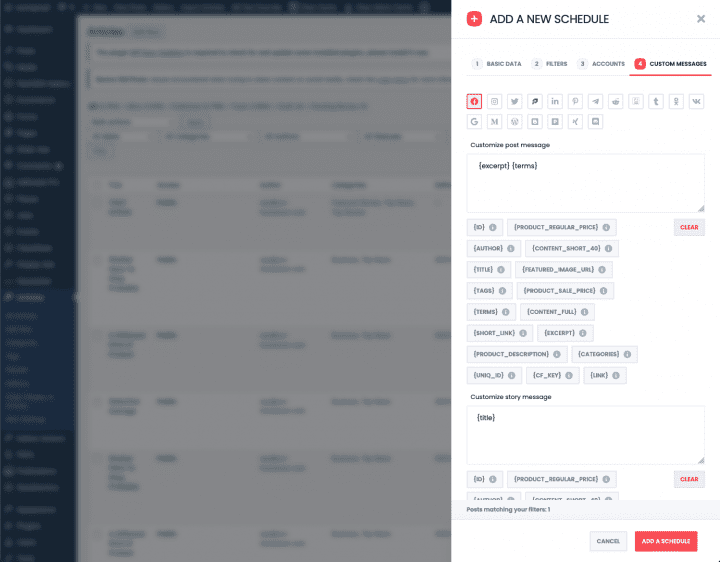
 Finally, on the fourth tab, Custom Message you can set a custom message for each type of account here that will override the default custom message settings for each platform.
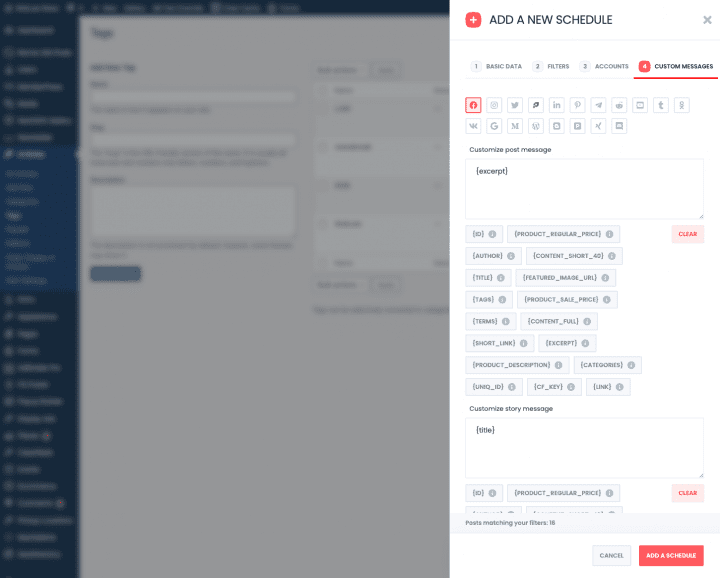 In the Custom Messages pane and you will see a text field, a set of dynamic placeholders.
The placeholders are excellent for adding additional metadata to a post beyond just its content. For instance as mentioned before under Publish settings, you can assign WordPress taxonomies, such as categories or tags, to be used as hashtags in the custom text of a post by using the {TERMS} placeholder. Another very useful placeholder is {EXCERPT} which will add the excerpt from your article to the shared post.
Once you are satisfied with all the settings click Add Schedule to complete the setup.
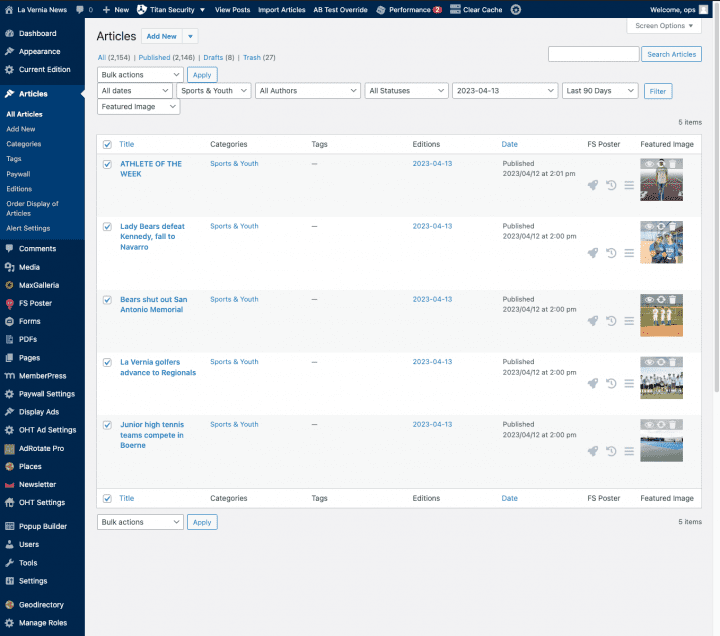
If you want to tag any articles that have already been published for inclusion in a schedule, we will need to utilize a Bulk Action on the Articles page. Click on the Articles link in the admin dashboard menu to bring up the list of all articles on the site. Use a combination of the search and filter functions to narrow down the list to just those you want to add the new tag.
There is a Tags column in the list, and if it is not visible you can toggle it on under the screen options bar at the top right of the page.
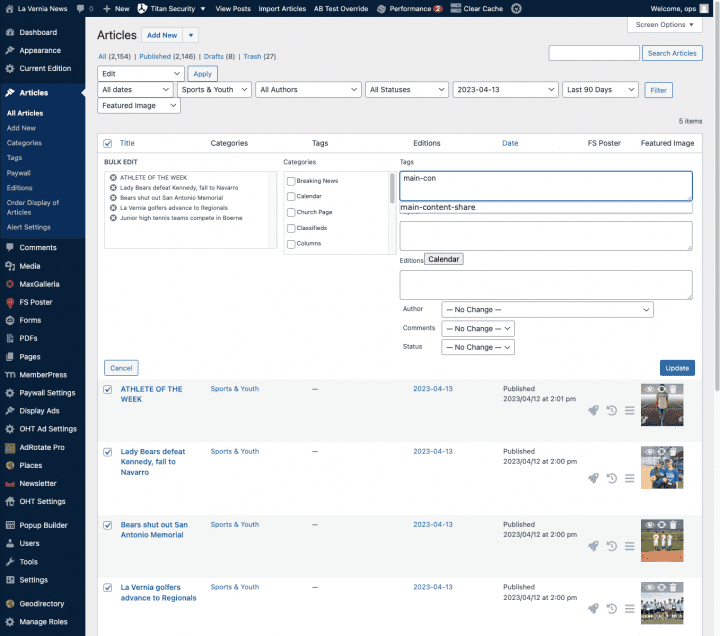
Thus note that none of these stories have been tagged. We want to add these to our schedule so we will tag these stories by clicking on the checkbox to the left of the Title column heading. This will select the entire list. Under the Bulk actions dropdown select edit and click Apply.
You can then type the new tag into the Tags field and click the Update button.
As long as these stories match any other schedule criteria (such as the date range), they will now be added to the collection of stories being shared under that Auto Tagger.
Schedule by Category
While there are a variety of options for sharing available in FS-Poster, we will focus on those most useful for our customers: Scheduling by Category.
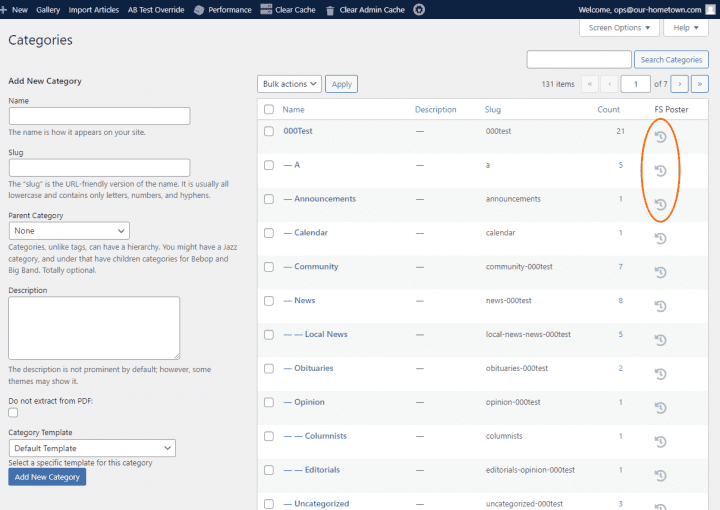
The simplest way to schedule a category is directly from the Categories page in the admin menu. Once there you will notice that there is now an FS Poster column with a new scheduling icon. If this column is missing click the Screen Options tab at the top of the page to reveal the column settings.
Clicking on this icon for a category will open an overlay where you can create a new schedule of that particular category.
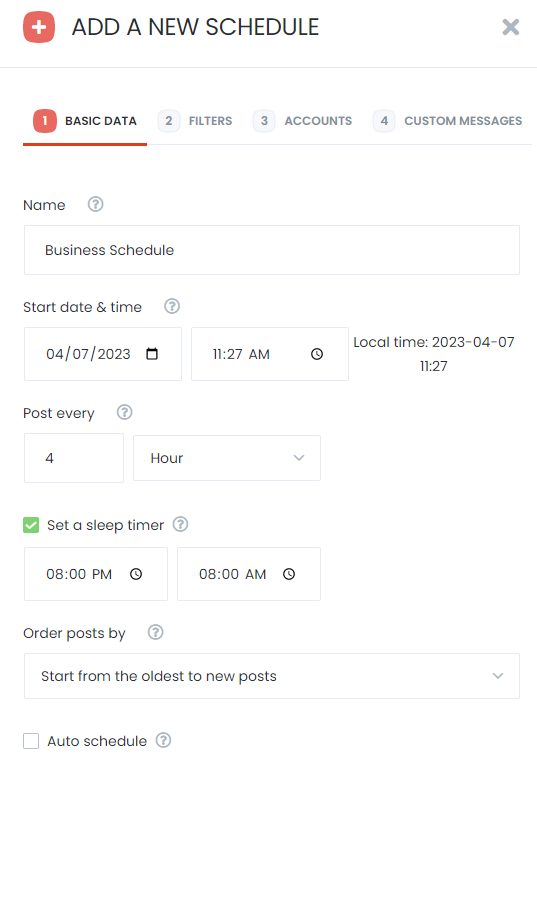 The first tab is where you set the Basic Data for the schedule.
- Rename the Schedule to something you can easily identify.
- Start date will likely not need editing
- Edit the Post Every setting to the desired interval.
- Set “Quiet Hours” with the sleep timer setting. You will probably want to use this to ensure that the schedule is not constantly posting all night.
- IMPORTANT – set the order posts by setting to “Start from the oldest to new posts.” Without this, the schedule will finish, and eventually stop running.
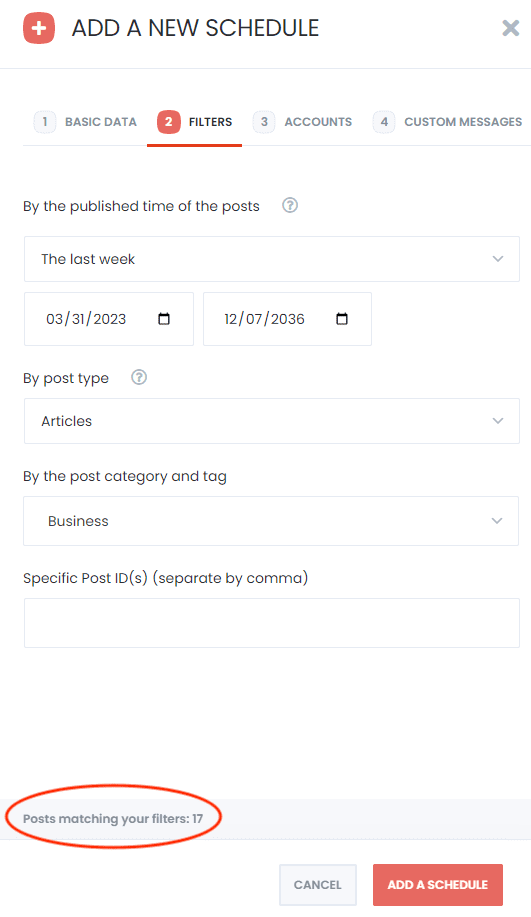 The second tab, Filters, is where you specify which content should be shared by the schedule.
- Select the date range for the posts. Be sure to set the end date into the distant future (example: 12/07/2036)
- Select Articles for the post type
- The Category should already be selected – look at the count at the bottom “Posts matching your filters: X” to ensure you have the category setup correctly. If the number seems excessive, or too low, check the date range first. Otherwise, you may have the wrong category selected.
Next go to the third tab, Accounts, and select “Add” to select the account, multiple accounts or a group of accounts.
 |
 |
Finally, on the fourth tab, Custom Message you can set a custom message for each type of account here that will override the default custom message settings for each platform.
In the Custom Messages pane and you will see a text field, a set of dynamic placeholders.
The placeholders are excellent for adding additional metadata to a post beyond just its content. For instance as mentioned before under Publish settings, you can assign WordPress taxonomies, such as categories or tags, to be used as hashtags in the custom text of a post by using the {TERMS} placeholder. Another very useful placeholder is {EXCERPT} which will add the excerpt from your article to the shared post.
Schedule a Single Article
From the Admin dashboard click on “Articles” and then “All Articles” to access the Articles listing.
Once there you will notice that there is now an FS Poster column with several icons. If this column is missing, click the Screen Options tab at the top of the page to reveal the column settings and tick any that are missing.
- The Rocket icon allows you to share an individual story immediately to any account and provides the custom message field.
- The Clock icon allows you to share with the same options, but can be scheduled into the future.
To schedule a single article:
Click the Clock icon and the Add a New Schedule Panel appears from the right.
The first Tab allows you to input name and basic scheduling options for the post.
- The Name field is pre-populated with from the headline, but you will want to update this before sharing. This name is only for the schedule itself so call it something representative.
- Choose a start date and time and if you want to share the post more than once. Schedules do not have an expiration and will share as long as posts fall under its settings.
- If you want to share repeatedly you can then set an interval for the subsequent posts.
Under the Filters tab you will find the WordPress post ID for the story you are sharing, and if needed other post IDs can be added to be shared on this same schedule.
The Accounts tab is similar to the other selection panels. Click the ADD button and select the accounts or account groups you would like to share to.
The Custom Message tab offers the same placeholder options to customize the content included with this share.
Once all options are set click the Add a Schedule button and you will be taken to the Schedules tab of FS-Poster listing all the current schedules.
Schedule from the Article Editor
From the Article Editor, make sure the setting panel is visible and on the Article tab. Scroll down until you find the FS Poster section. Twirl it open to reveal the sharing options.
First you will note that you can select a custom image for the share by clicking in the camera box and picking or uploading one from the Media Library. If not set, the share will use the featured image of the post.
Just beneath the custom image option will be a list of all previous shares of this post if any have occurred.
Finally the Share and Schedule buttons bring up same or scheduling panel as our other methods.
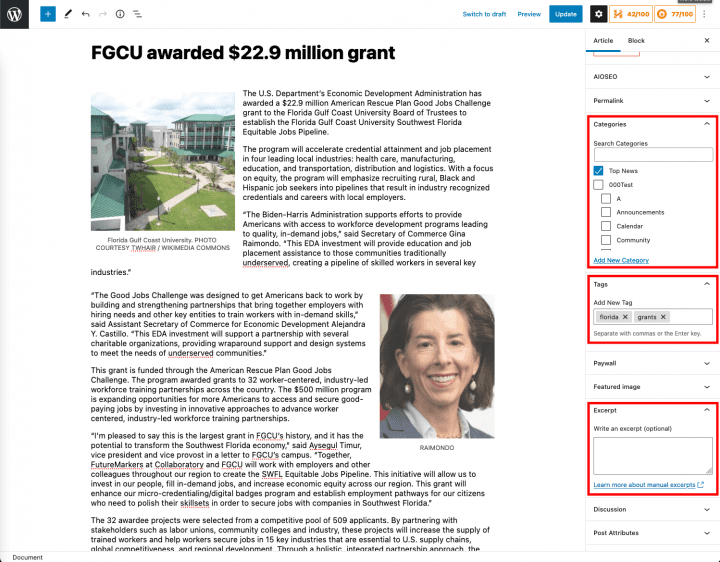
If you are using the {EXCERPT} placeholder in the custom message it can be set here in the Article editor as well. In addition if the custom message is set to include {TERMS} the tags set in the article editor be used as hashtags for the shared post.
Schedule using Bulk Actions
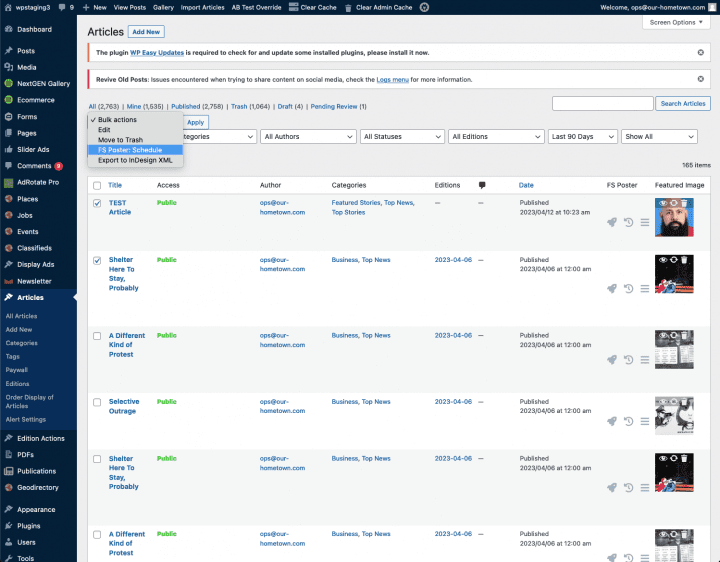
From the article list you can select multiple entries by clicking the small square to the left of the Title. FS-Poster utilizes this to allow you to schedule multiple posts at once.
Select several stories and under the Bulk actions dropdown, select FS Poster: Schedule and click the Apply button.
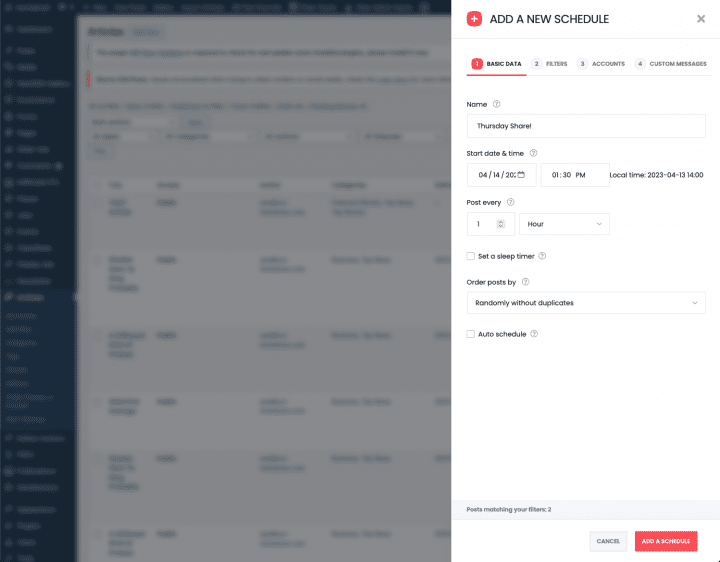
Again the Add a New Schedule panel appears from the left.
With multiple posts scheduled the plugin now prompts you for how often you want to share from this set of posts and in what order: Randomly without duplicates, Randomly, Start from oldest to newest, and Start from latest to old posts.
The other panels are exactly the same although you will notice the multiple post IDs on the Filters page.
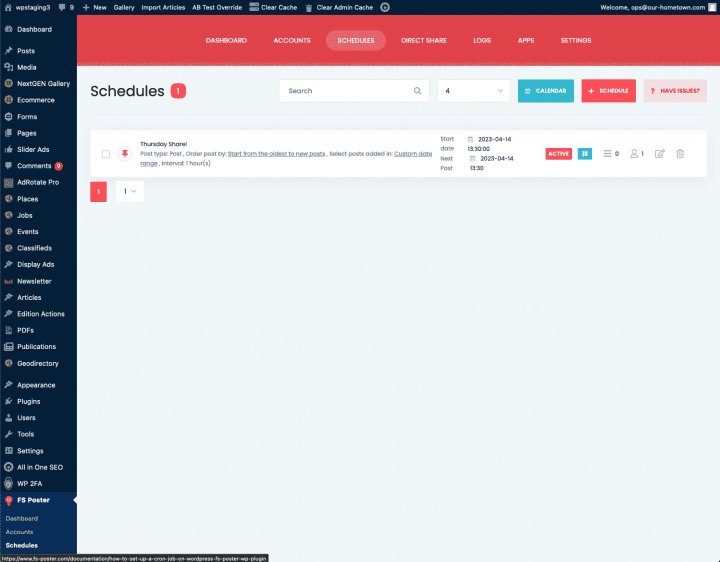
Finally click Add a Schedule to be taken again to the Schedules tab of the FS-Poster plugin.
Schedules and Logs Panels
Schedules Listing
When you create a new schedule with these various methods, you will always be taken to the Schedules tab of FS-Poster listing all of the current schedules. You can see the status, number of log entries, and how many social accounts are being targeted for each schedule.
Clicking on the pause button will halt sharing on that particular schedule.
Clicking the pencil icon brings up the same Schedule panel we have seen before so that you can make any necessary updates.
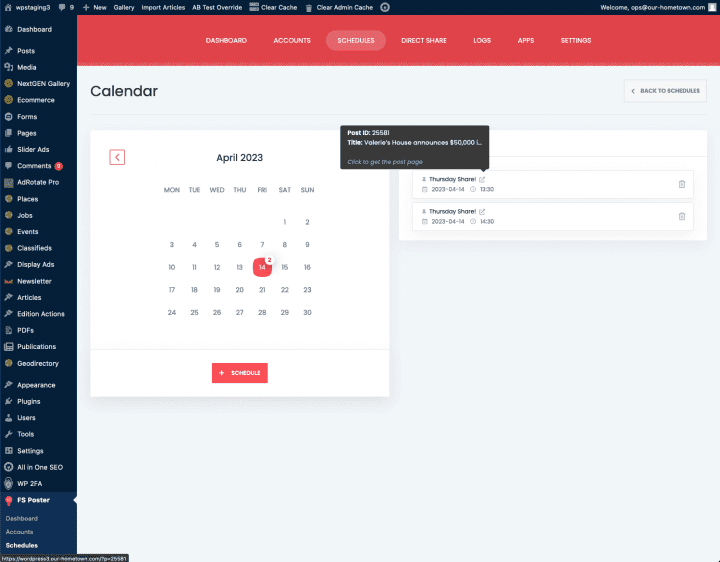
To view the individual posts assigned to a schedule, click on the Calendar button.
Calendar View
The Calendar page contains a month view showing when and how many posts are scheduled for a particular day, while a second panel lists all of the scheduled posts with dates and times assigned to them. By hovering over the new tab icon to the right of the share name it will reveal the post headline and ID. You can go directly to the post by clicking on the icon.
Share Logs
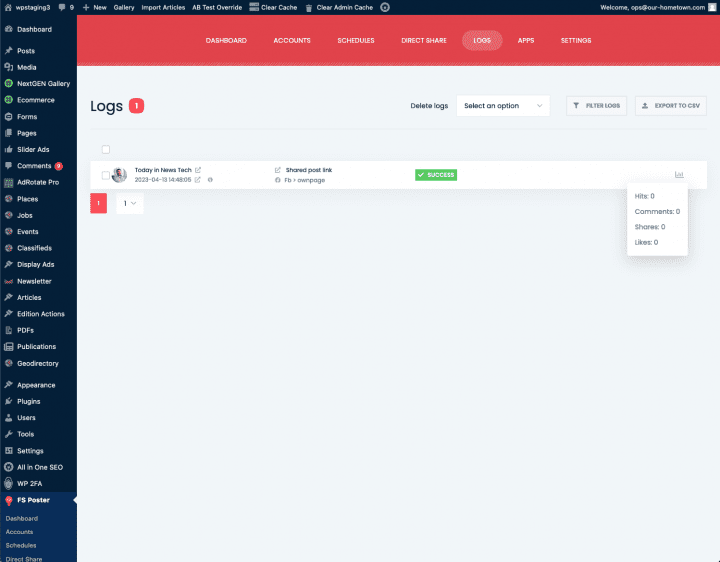
All of the shared posts will appear in the Logs tab of the FS-Poster plugin.
Each entry contains a new tab link to the profile to which the post was shared, the original post on your website and the post on the social site itself. Depending on the platform, you will also find some simple metrics by hovering over the graph icon to the right.
Additionally you can filter and export this data for your team.
Sharing Content Manually
Sharing From the Articles List
Log in to your WordPress dashboard.
Click on “Articles” and then “All Articles” to access the Articles listing.
Look for the FS Poster column with several icons. If this column is missing, click the Screen Options tab at the top of the page to reveal the column settings and tick any that are missing.
- The Rocket icon allows you to share an individual story immediately to any account and provides the custom message field.
- The Clock icon allows you to share with the same options, but can be scheduled into the future.
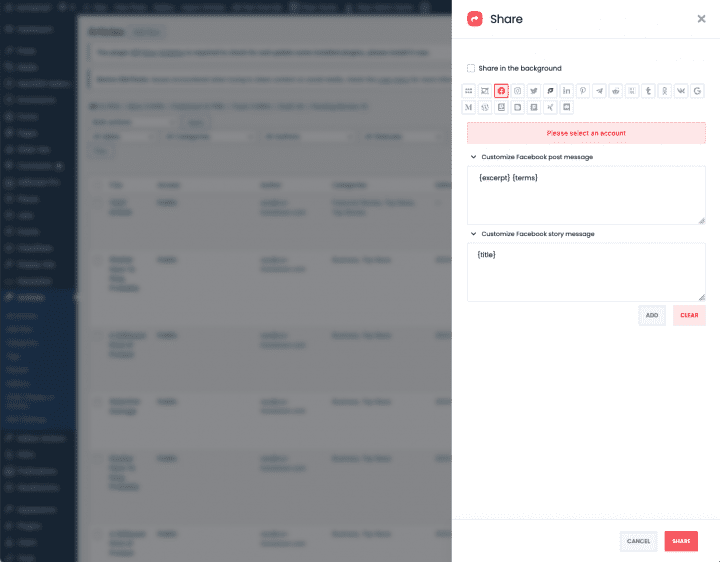
Click the Rocket icon and the Share Panel appears from the right. Click on the icon for the target platform to reveal its options, Facebook in this example.
For the custom message you will see the default placeholders where you can change or update the message if desired.
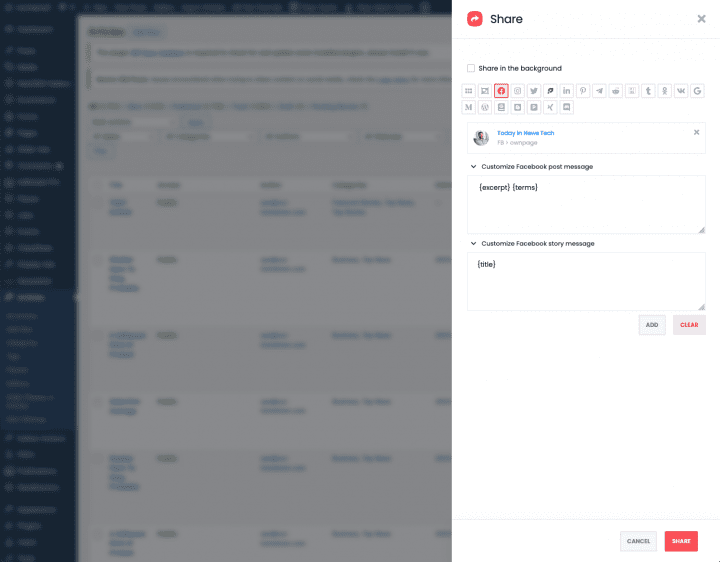
Click the ADD button to select an account or group of accounts to which this post will be shared.
Once you’ve selected the accounts and updated the custom message if needed, click the Share button.
A modal popup window will show you your progress and provide a link to your new post on Facebook. Note it you toggle the Share in Background option under General settings, the share will occur without the confirmation.
Sharing From the Article Editor
From the Article Editor, make sure the settings panel is visible and on the Article tab. Scroll down until you find the FS Poster section. Twirl it open to reveal the sharing options.
First you will note that you can select a custom image for the share by clicking in the camera box and picking or uploading one from the Media Library. If not set, the share will use the featured image of the post.
Just beneath the custom image option will be a list of all previous shares of this post if any have occurred.
Finally the Share and Schedule buttons bring up the same sharing or scheduling panel as our other methods.
Several other sections relevant to our social shares are any taxonomies we may want to use as hashtags. You can learn more about this setting in the section on General and Publish settings, but in this case we are using the article category and any tags as hashtags in our social posts.
Also if you are using the {EXCERPT} placeholder in the custom message it can be set here in the Article editor as well.
Direct Share from FS-Poster
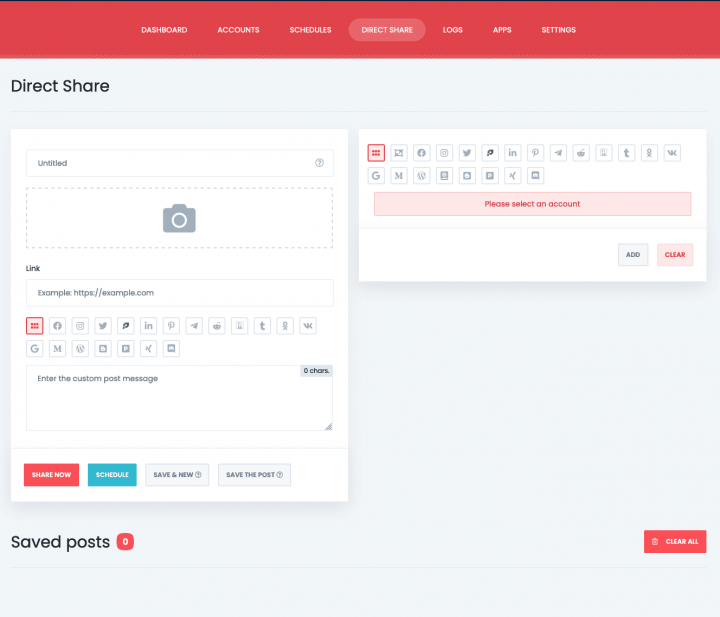
The Direct Share panel allows you to share to the same accounts without writing an actual post. Here you can craft a post with a headline, custom image and a custom message to share along with any link you would like.
The share and scheduling options are the same for Direct Shares as for post shares.

