NextGEN Gallery plugin now available on our platform
|
Click play to LISTEN to the article below
|
Our-Hometown is pleased to announce that we’ve added a new, more robust photo gallery plugin to our suite of tools available to customers: NextGEN Gallery!
The NextGEN Gallery plugin allows users to upload a collection of photos in the back end of the website and organize them into a gallery, much like our previously-supported photo gallery plugin, MaxGalleria. The big advantage to NextGEN Gallery, aside from the general ease of use, is the ability to display the same gallery of photos in multiple locations and in different layouts each time.
I’ll demonstrate what I mean below. First, let’s create our first gallery using NextGEN Gallery.
1. Create the Gallery
You can actually create a NextGEN Gallery from any page or article editor, but for the sake of this tutorial, we’re going to keep it as simple as possible and start from the dashboard.
Find the NextGEN Gallery item on the dashboard menu and navigate to the Add Gallery/Images page.
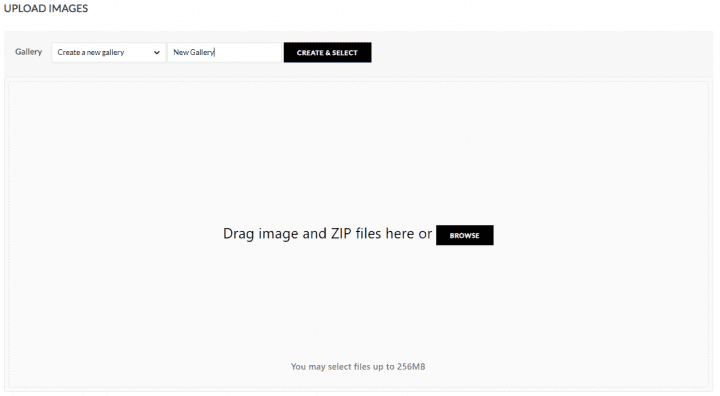
You’ll be presented with a page asking you to select which gallery you want to upload photos to. Since we have not yet created a gallery, the only option for us is to “Create a new gallery.”
I’ve entered the name “New Gallery” and clicked Create and Select.
Once the “New Gallery” is selected, click the “Browse” button to upload some photos from your computer and add them to the gallery. The progress is visible as each photo is uploaded and saved to the gallery.
Once your photos have finished uploading, you can navigate to NextGEN Gallery -> Manage Galleries to edit the gallery you’ve created or any of the photos included within.
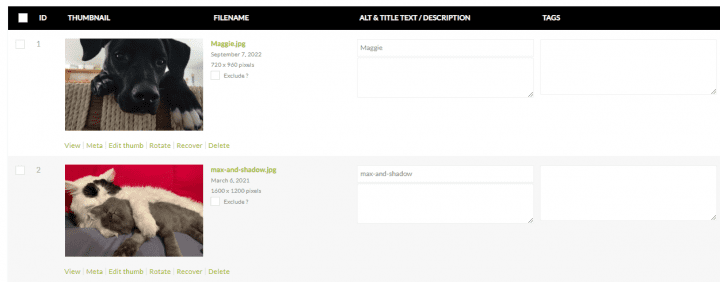
You’ll notice that we did not at any point select a “template” or adjust any settings that determine how this photo gallery will appear on a page or within an article. That is because, unlike with MaxGallery, a single photo gallery in NextGEN Gallery can be displayed in various places each with a different template.
2. Placing a Gallery
In this example, I’m going to place our first gallery inside of an Article named “Pet Photos of the Week.” We’ll assume this publication is highlighting some photos of their readers pets in the new article.
If using the classic editor, you’ll see the option to Add Gallery just above the toolbar. If using the block editor, you’ll want to add a new Block and search for the NextGEN Gallery block.
Once you’ve added the block and clicked Add Gallery, you’ll see a page asking you to select which Gallery (or galleries) you want to add to the page. Below that, there are a number of gallery templates available to choose from that determine how your gallery will display.
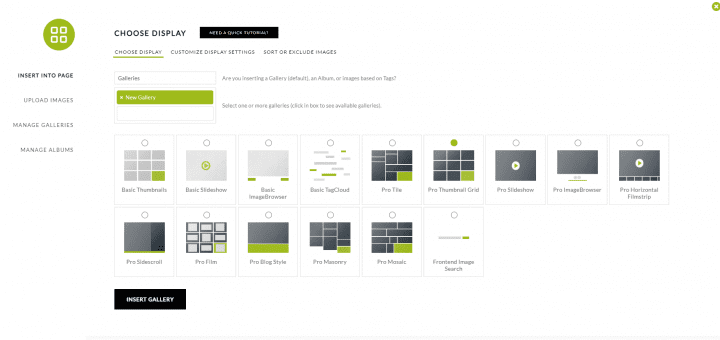
These templates include basic options for thumbnails, slideshows & image browsers, as well as the paid Pro versions of these templates. All are available to OHT customers.
Once you’ve selected a template, you can click the Customize Display Settings tab to further adjust the gallery settings.
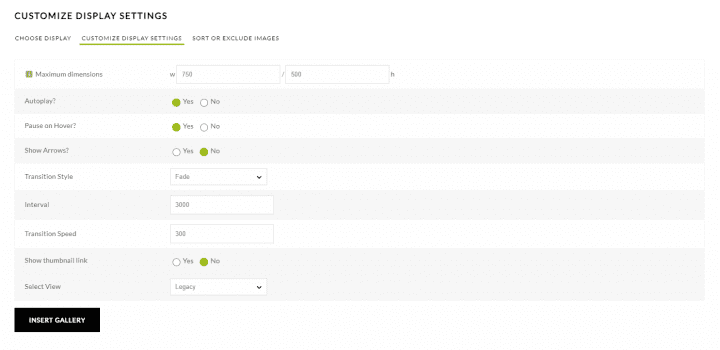
I went with the simple Pro Thumbnail Grid to create the gallery below.

That is all there is to it! If I wanted to display the same set of photos in a different format somewhere else on the website, I would follow the same process: click Add Gallery from the NextGEN block/toolbar and select your existing Gallery of Photos, then choose the format you want to display it!
3. Setting a Featured Image
One final thing that NextGEN Gallery makes easier than ever is setting a featured image for the article or page to which your gallery is being embedded. In the past, if you embedded a gallery inside of an article, you would need to manually set the Featured Image for that article by separately uploading one of the photos from the gallery as the featured image.
NextGEN Gallery makes this quick and easy by providing a button right below the existing “Set Featured Image” option that lets you select one of the photos inside the gallery as the article’s featured image, saving you the time of hunting it down and uploading a second copy of the image.
We hope you enjoy all of the benefits of this great new plugin we’ve added. We believe it is superior to our previous photo gallery plugin both in terms of features as well as ease of use. If you need any help or have any questions getting this set up on your website, reach out to us at ops@our-hometown.com at any time!
- ← Integrating MemberPress with Naviga’s CirculationPro software | Webinar Replay
- Kristen Weaver of the Wilson County News | Publisher Interview →


Recent Comments