Scheduling changes in the Customize tool
|
Click play to LISTEN to the article below
|
One of the most powerful features of Our-Hometown’s WordPress Platform is the Customize tool, which allows publishers to adjust and personalize all aspects of their website to match their own vision.
We published an article last year demonstrating how you can use the Customize tool to swap in a new site logo, modify site colors, update site menus, change the fonts, and add or re-arrange widgets as desired.
Now, we’re excited to introduce you to another useful feature of the Customize tool: Saving Drafts & Scheduling Changes!
Saving Drafts with the Customize tool is exactly what it sounds like. This function allows you to save any changes you’ve made in the Customize tool as a draft without publishing the changes to the live website so that you can return to your work and finish your changes later. If you’re working on implementing a new look for your website, it may well be a project too large to finish in one session; so this functionality can be super valuable.
The best part about Saving Drafts with the Customize tool, though, is that once you’ve saved your changes as a draft, you are provided a Preview URL that you and other staff members can use to preview what the website will look like with your “draft” changes applied. This is a great way to share your ideas and get feedback from your staff before making the changes live to readers and visitors.
Scheduling Changes in the Customize tool is another useful feature that ties into the Draft functionality. Much like Articles, PDFs, and other post types on our platform, you can schedule your drafted changes in the Customize tool to Publish at a certain time in the future.
As an example, let’s say you’re updating your site with a brand new spring-themed logo and color scheme. Rather than staying up late to publish the new logo and colors at midnight on March 20th (the first day of Spring), you can save these changes as a Draft and then Schedule them to publish automatically at the desired time.
So how do you do it?

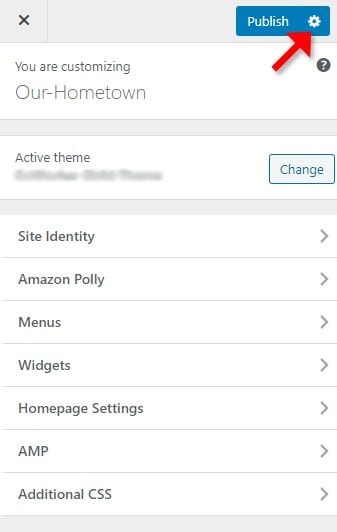
Both the Save Draft and Schedule Changes options are accessed the same way. With the Customize tool open and changes applied, look to the right of the Publish button you would normally use to save your changes — you’ll notice a small gear-shaped icon.
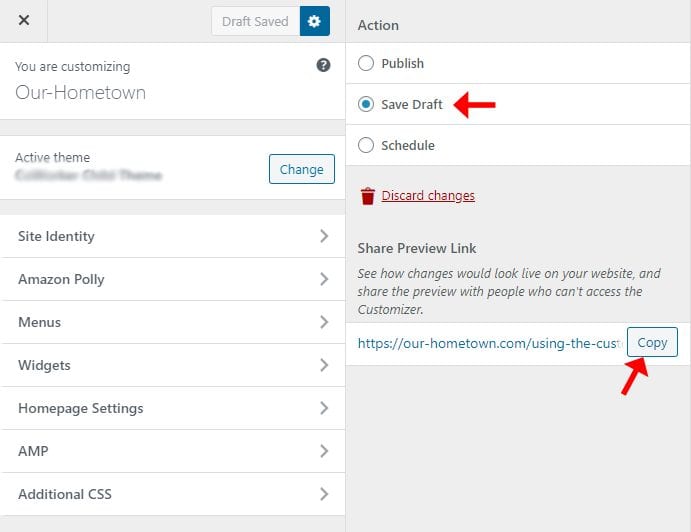
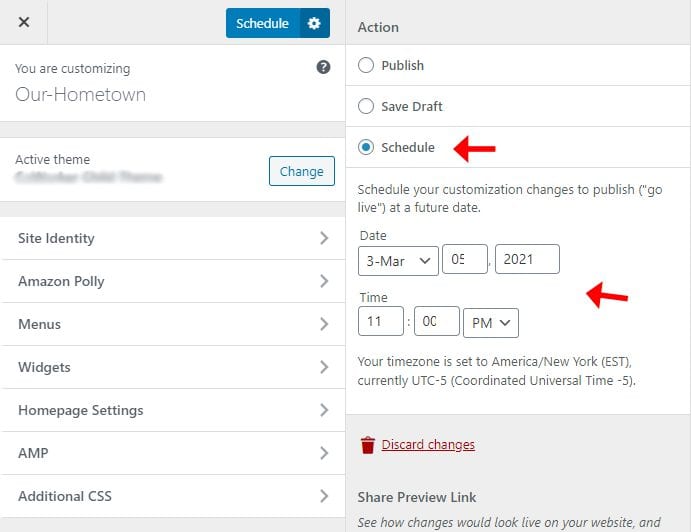
When you click the gear icon, another layer of menus will slide out allowing you choose whether you want to Publish, Save Draft or Schedule. Select your desired action, and you’ll see the original “Publish” button change to reflect the action you’ve chosen.
Once you’ve saved your changes as a Draft, you’ll see a Preview URL along with a “Copy” button to automatically copy the URL so that you can paste it elsewhere to share with co-workers or others you want to preview your changes.
If you choose Schedule instead, you’ll be presented with date & time selection options to choose when the changes should go live. Fill these out accordingly and click Schedule!
And that’s all there is to it!
It is important to note that once you’ve scheduled changed or saved changes as a draft, you won’t be able to use the Customize tool to edit the current layout until your changes publish or you discard the changes to start over.
As always, if you have any questions or need any help, reach out to our Support Team at any time! Just send an email to ops@our-hometown.com with your question or issue.
- ← Our-Hometown to sponsor upcoming Webinar series hosted by “The News Guru,” Kevin Slimp!
- Creating a category-driven Newsletter →


Recent Comments