The Power of Patterns: Block Editor Basics
|
Click play to LISTEN to the article below
|
The WordPress block editor (often called Gutenberg) has revolutionized how we create content, moving from a single text field to a modular system of blocks. One of the most powerful, yet sometimes overlooked, features within this system is Block Patterns. If you’re not using them yet, you’re missing out on a fantastic way to build beautiful, complex layouts quickly and consistently.
What Exactly Are Block Patterns?
Think of block patterns as pre-designed collections of blocks, arranged into ready-to-use layouts or sections. Instead of adding individual blocks (like headings, paragraphs, images, columns) one by one and styling them, you can insert a complete pattern with just a few clicks. These can range from simple call-to-action buttons to intricate page sections like testimonials, contact forms, image galleries, or multi-column layouts.
Why Use Block Patterns?
The advantages of incorporating patterns into your workflow are significant:
- Speed Up Content Creation: This is the most obvious benefit. Building complex layouts block by block takes time. Patterns provide shortcuts, allowing you to insert sophisticated designs instantly. Need a pricing table or a feature comparison section? There’s likely a pattern for that.
- Ensure Design Consistency: Patterns help maintain a consistent look and feel across your website. Whether provided by your theme or created by your team, using predefined patterns ensures that elements like calls-to-action, team member profiles, or service descriptions follow the same design principles everywhere they appear.
- Access Professional Designs: You don’t need to be a designer to create visually appealing layouts. Themes often bundle beautifully designed patterns. Furthermore, the official WordPress Pattern Directory offers thousands of user-submitted patterns that you can easily copy and paste into your site.
- Simplify Complex Layouts: Building intricate designs with multiple columns, nested blocks, and specific styling can be tricky. Patterns handle the complexity for you, providing a reliable foundation you can then customize with your own content.
How to Find and Use Block Patterns
Using patterns is straightforward:
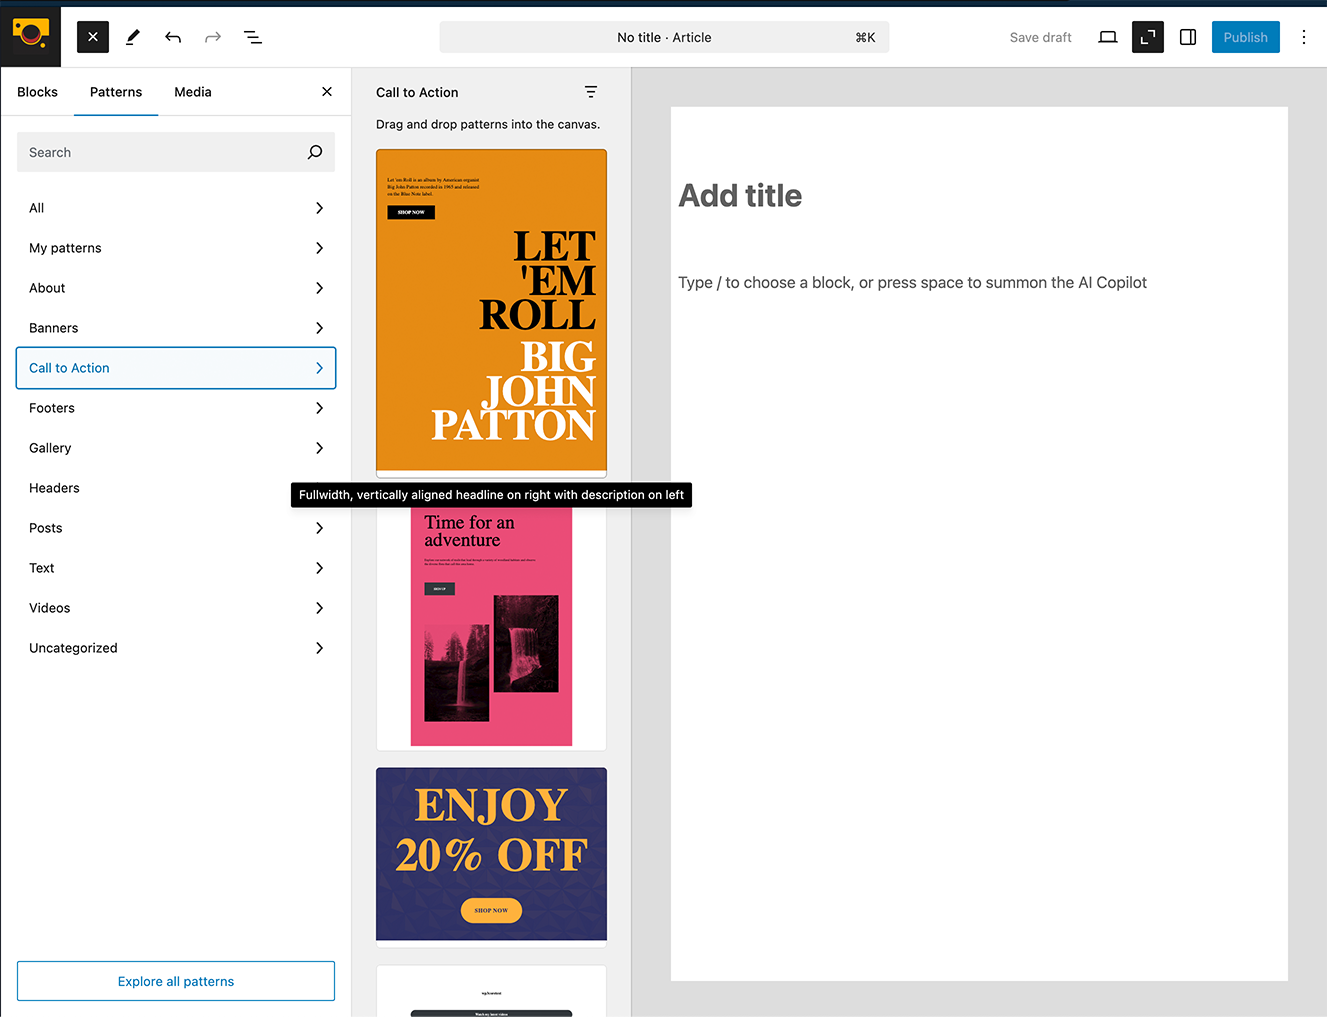
- Open the Inserter: In the block editor, click the blue or black (+) button (usually in the top-left corner or within the editor canvas) to open the block inserter panel.
- Navigate to the Patterns Tab: Within the inserter panel, you’ll see tabs for ‘Blocks’, ‘Patterns’, and potentially ‘Media’. Click on the ‘Patterns’ tab.
- Browse Categories: Patterns are often organized into categories (e.g., Buttons, Columns, Gallery, Headers, Text, Query). You can also explore patterns specific to your active theme or browse all available patterns. Many themes also offer a dedicated “Explore all patterns” button at the bottom of the pattern inserter tab which opens a larger modal window for easier browsing.
- Search: Use the search field within the Pattern Directory integration, to search for specific patterns (e.g., “contact form,” “testimonial”).
- Click to Insert: Simply click on the pattern preview you like, and it will be inserted directly into your page or post content at the location of your cursor.
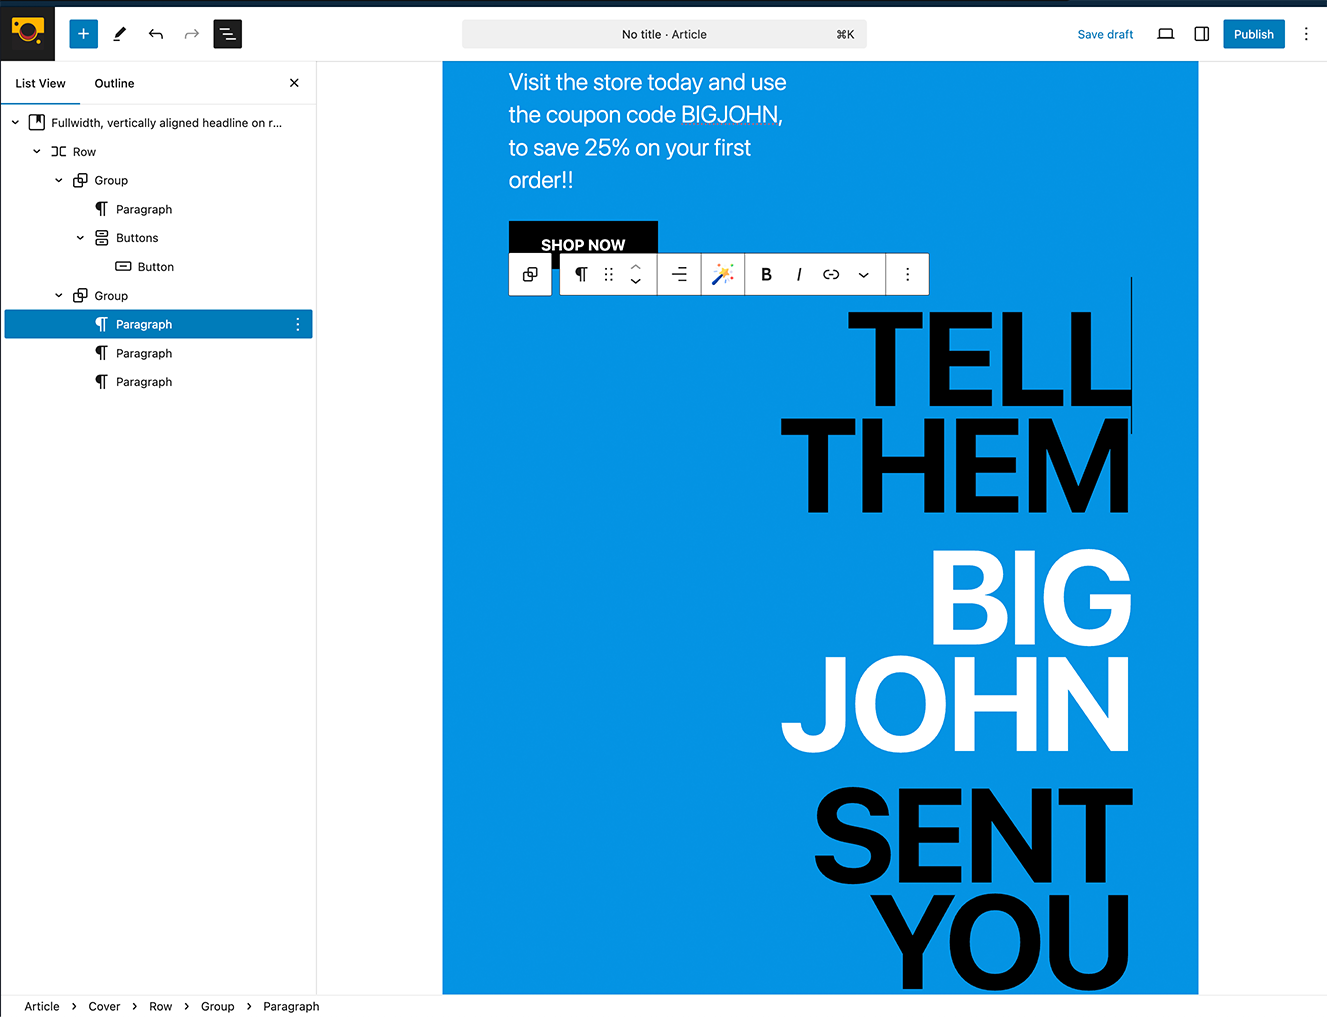
- Customize: Once inserted, the pattern is just a collection of regular blocks. You can click into any block within the pattern to edit the text, replace images, change colors, or adjust settings just like any other block. Unless it’s a synced pattern (more on that below), changes you make here won’t affect the original pattern or other instances of it.
Creating Your Own Block Patterns
One of the most powerful features is the ability to create your own patterns, saving layouts you frequently use or want to standardize across your site. Here’s how:
- Build Your Layout: First, create the combination of blocks exactly as you want them in the editor. Arrange headings, paragraphs, images, buttons, columns, etc., and apply any desired styling (colors, spacing, typography).
- Select the Blocks: Carefully select all the blocks you want to include in your pattern. You can do this by:
- Clicking and dragging your mouse over the blocks.
- Clicking the first block, holding Shift, and clicking the last block.
- Using the List View to select multiple blocks.
- You can also create a group of all the blocks you would like to include in the Pattern for quick selection and reuse.
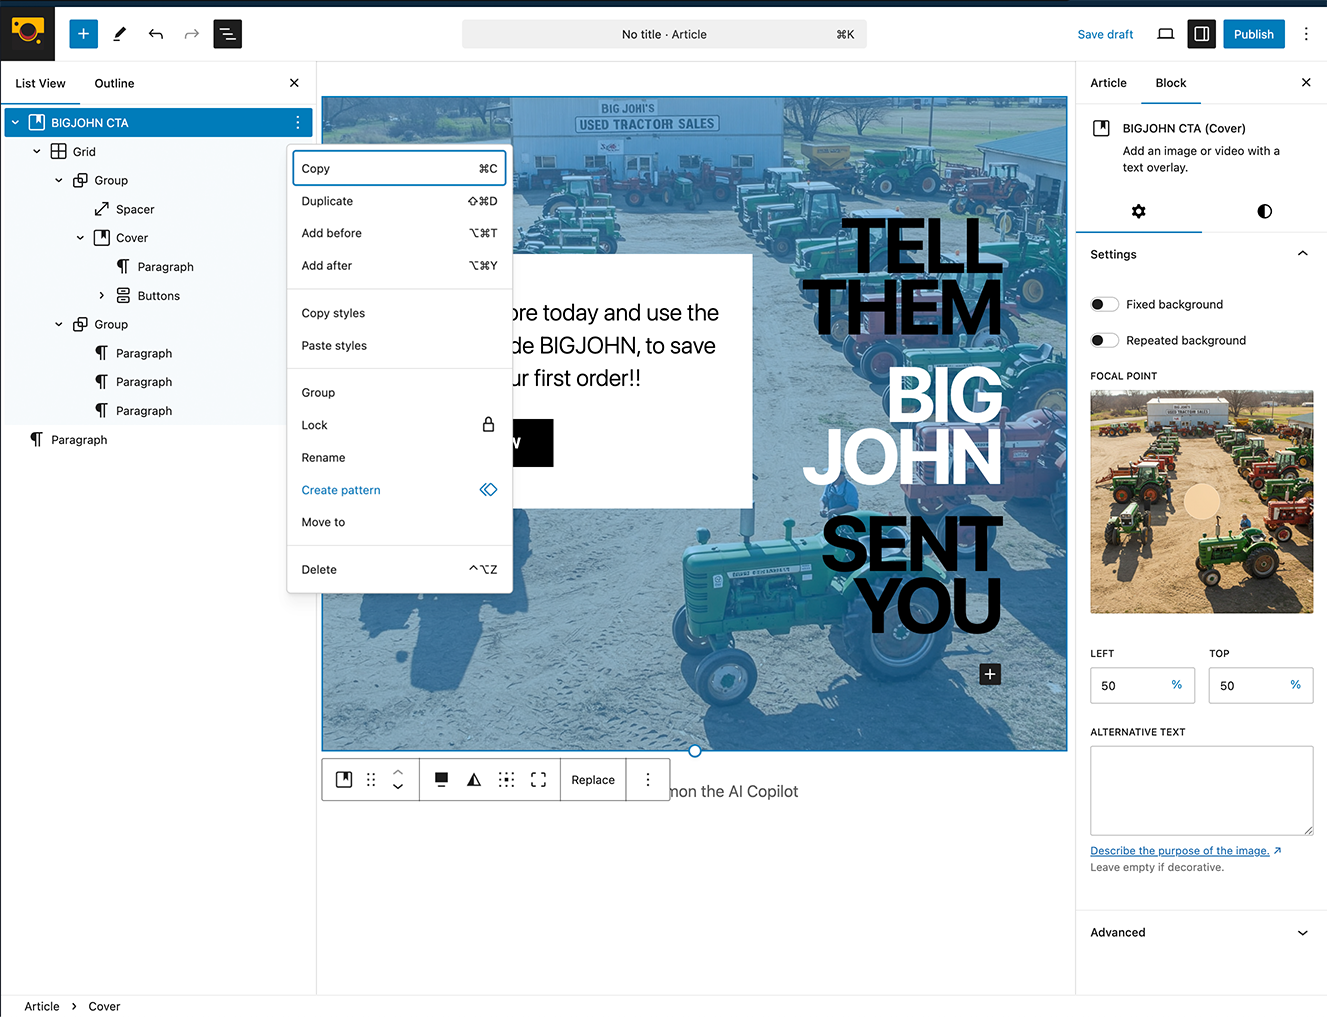
- Open the Options Menu: Once the blocks are selected, an options menu (three vertical dots ⋮) will appear in the block toolbar for the selection. Click on it. You can also find the menu next to the topmost block if you have created a Group for your design.
- Choose ‘Create Pattern’: From the dropdown menu, select the “Create pattern” option.
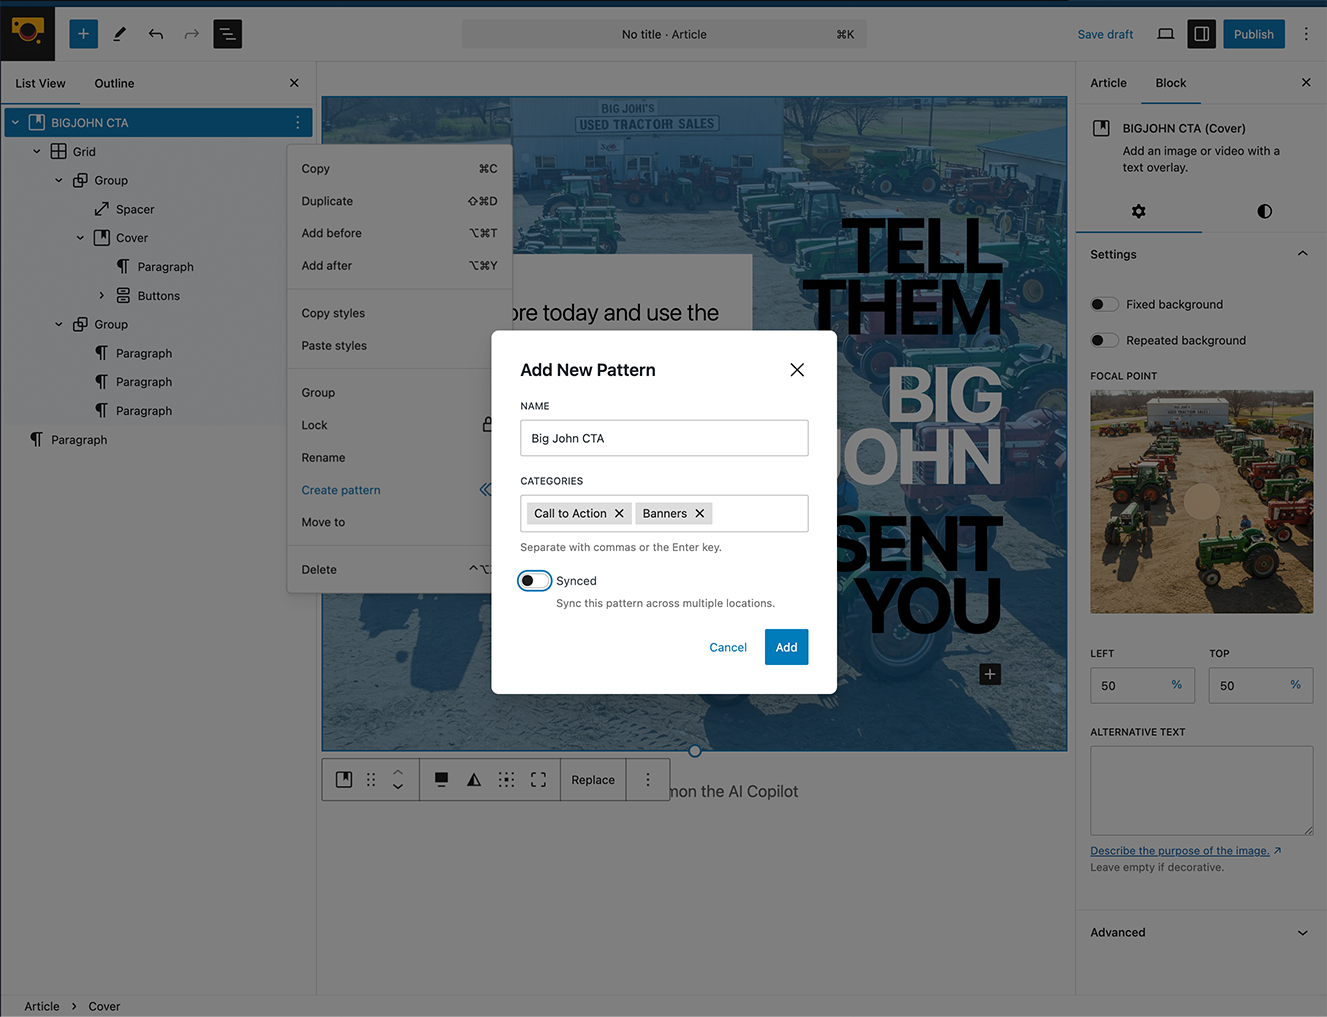
- Configure Your Pattern: A pop-up window will appear:
- Name: Give your pattern a descriptive name (e.g., “Two-Column Feature Section,” “Author Bio Box”). This is how you’ll find it later.
- Categories (Optional): You can assign your pattern to one or more categories to help organize it within the inserter. You can choose existing categories or create new ones.
- Synced: This is a crucial option:
- Leave it OFF (Default): Creates a standard pattern. When you insert this pattern, it’s a copy of the original layout. Editing the inserted pattern does not affect the original or any other places you’ve used it. This is best for layout templates you want to customize each time.
- Toggle it ON: Creates a Synced Pattern (previously known as Reusable Blocks). See the next section for details.
- Click ‘Create’: Once configured, click the “Create” button.
Your custom pattern is now saved and will appear under the ‘My patterns’ category (or any other categories you assigned) in the Patterns tab of the block inserter, ready to be used! You can manage your created patterns via the main WordPress admin menu under Appearance > Patterns.
Understanding Synced Patterns
When creating a pattern, you have the option to make it Synced. This is what WordPress previously called “Reusable Blocks.” Here’s the key difference:
- Standard (Non-Synced) Patterns: When you insert a standard pattern, you get an independent copy of the block arrangement. Changes made to this inserted copy only affect that specific instance. The original pattern remains untouched, and so do any other instances you’ve inserted elsewhere. Think of it as a starting template.
- Synced Patterns: When you insert a synced pattern, it remains linked to the original. If you edit any instance of a synced pattern anywhere on your site, those changes will automatically apply to every other place that same synced pattern is used. This is incredibly powerful for content you need to keep consistent everywhere, such as:
- Calls-to-action you might want to update sitewide.
- Contact information footers.
- Standard disclaimer text.
- Promotional banners.
The table below summarizes the key differences between these two types of patterns:
| Feature | Block Patterns | Synced Patterns (Reusable Blocks) |
|---|---|---|
| Purpose | Insert pre-designed layouts for one-time use | Create reusable content that updates globally |
| Editing | Changes are local to the specific instance | Changes in one instance affect all instances |
| Use Cases | Unique page sections, initial layout setup | Headers, footers, calls to action, standard content |
| Synchronization | No automatic synchronization | Optional synchronization; can be detached |
| Creation | Via Block Inserter or Pattern Directory | Via Block Editor “Create pattern/reusable block” |
Editing Synced Patterns
There are two ways to edit a Synced Pattern:
In the Block Editor:
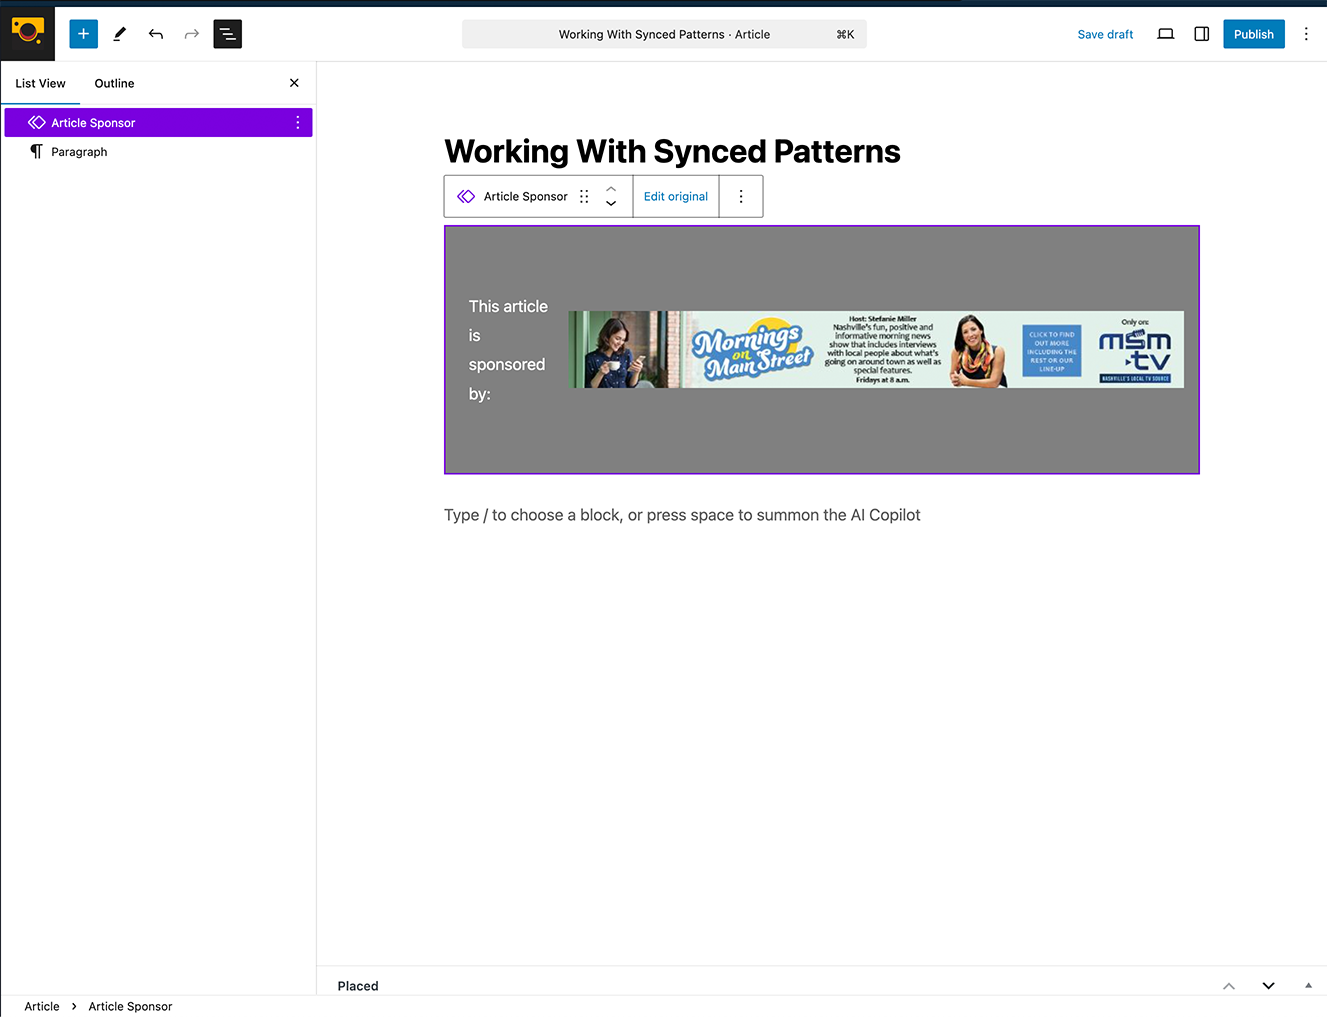
- Select the Synced Pattern in the main content area or via the List View
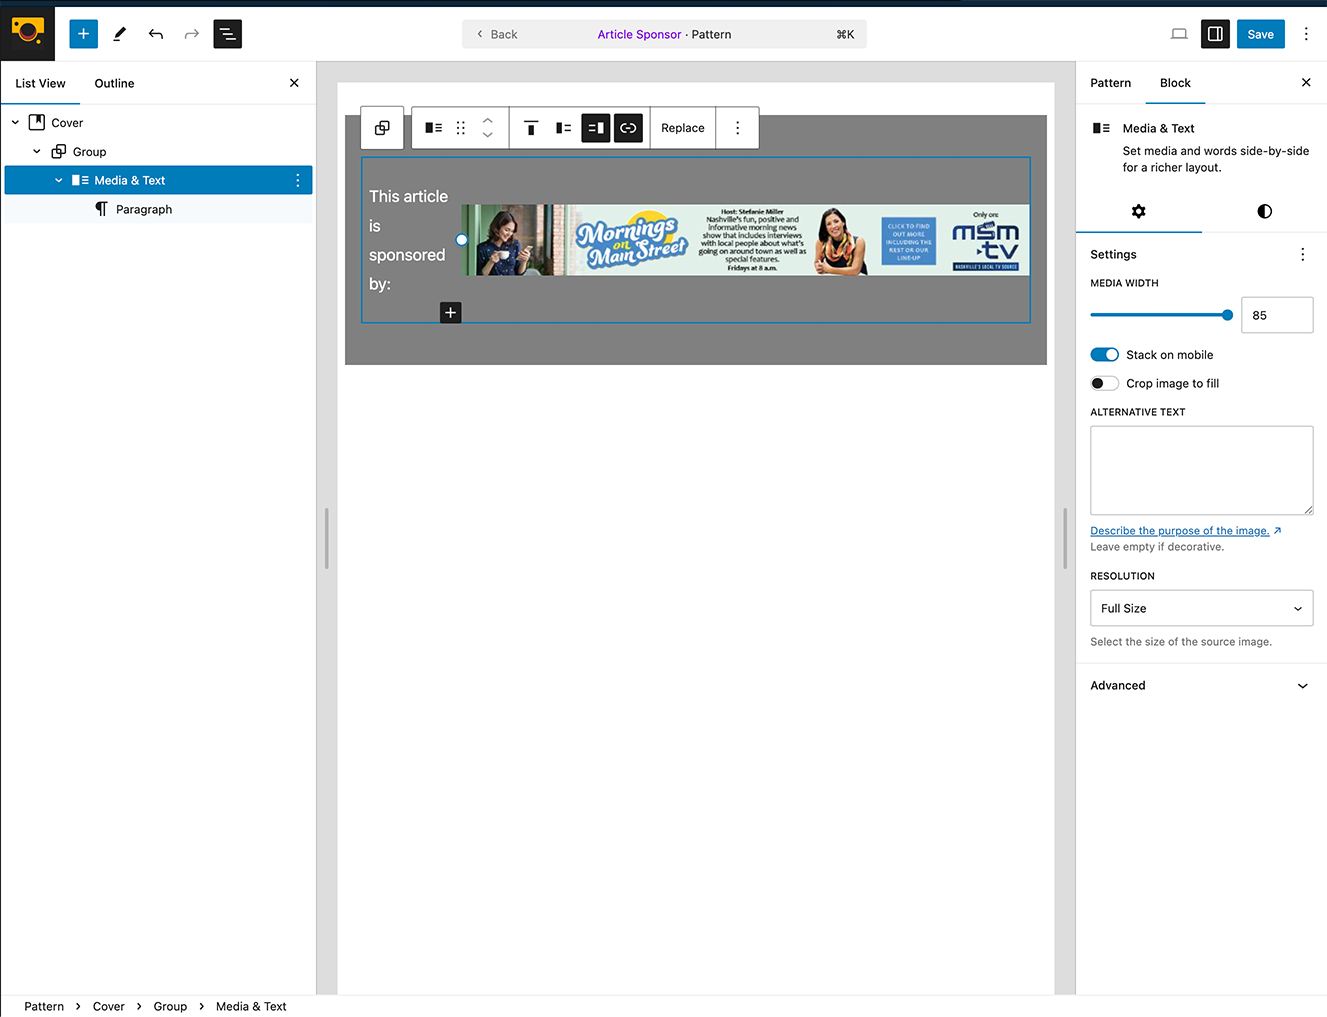
- In the Block Toolbar, you will see the option to “Edit Original.” Click that link to open the Synced Pattern in the Pattern Editor. Notice that the field in the Top Toolbar changes from the Headline to the name of the Synced Pattern to indicate that you are in the Pattern Editor.
- Make any changes as you normally would when editing Blocks, then click the Save button at the top right to commit your updates.
- To return to the main editor, click the Back link in the Pattern Name field in the Top Toolbar.
In the Pattern Editor:
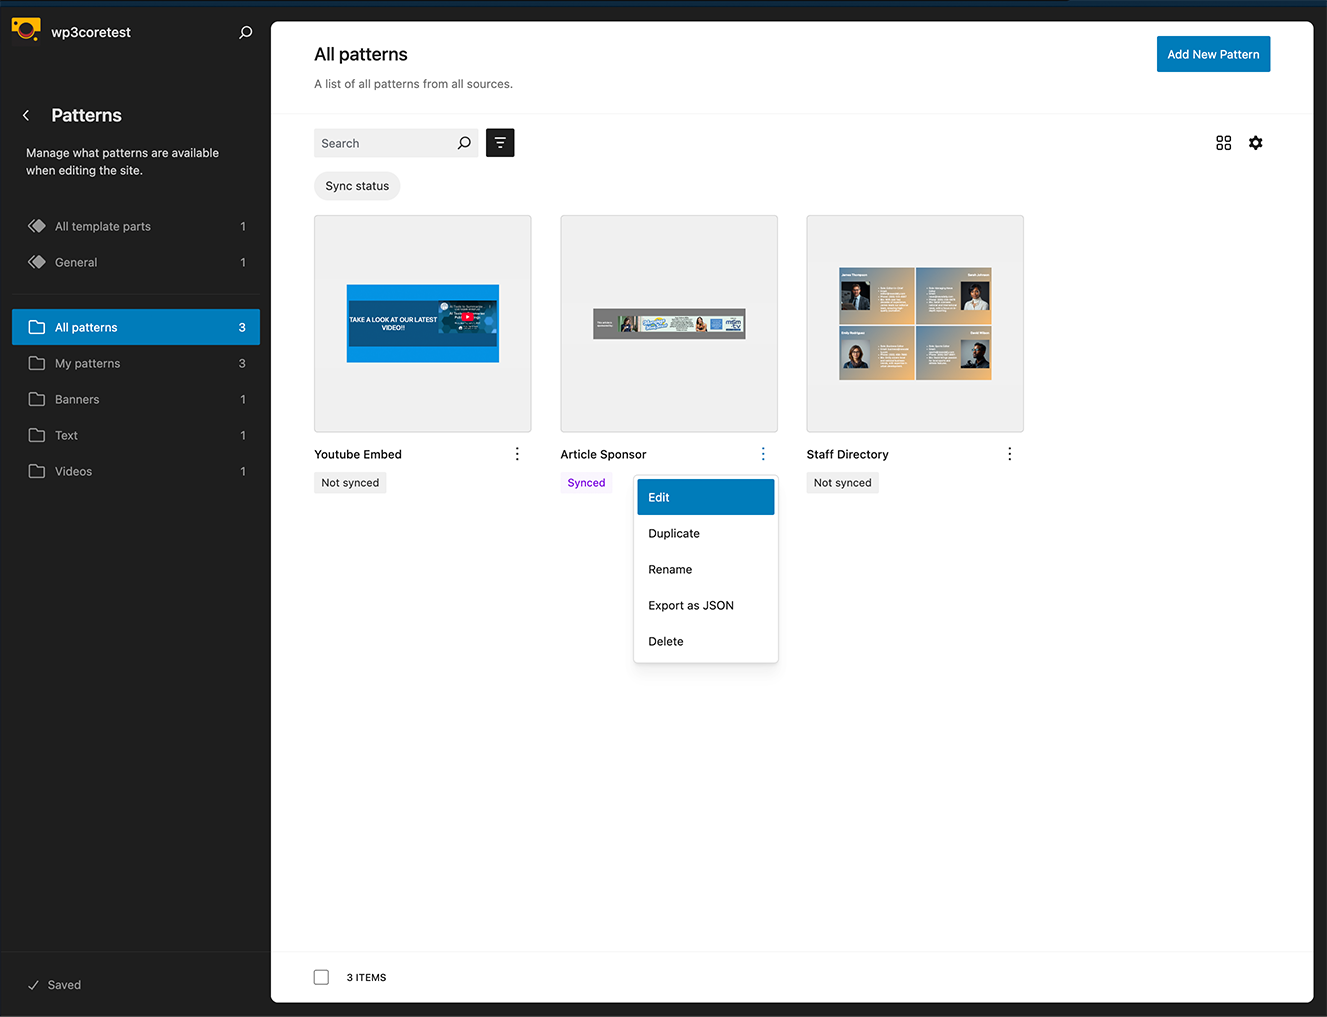
- Open the Pattern Editor from the Dashboard under Appearance > Patterns
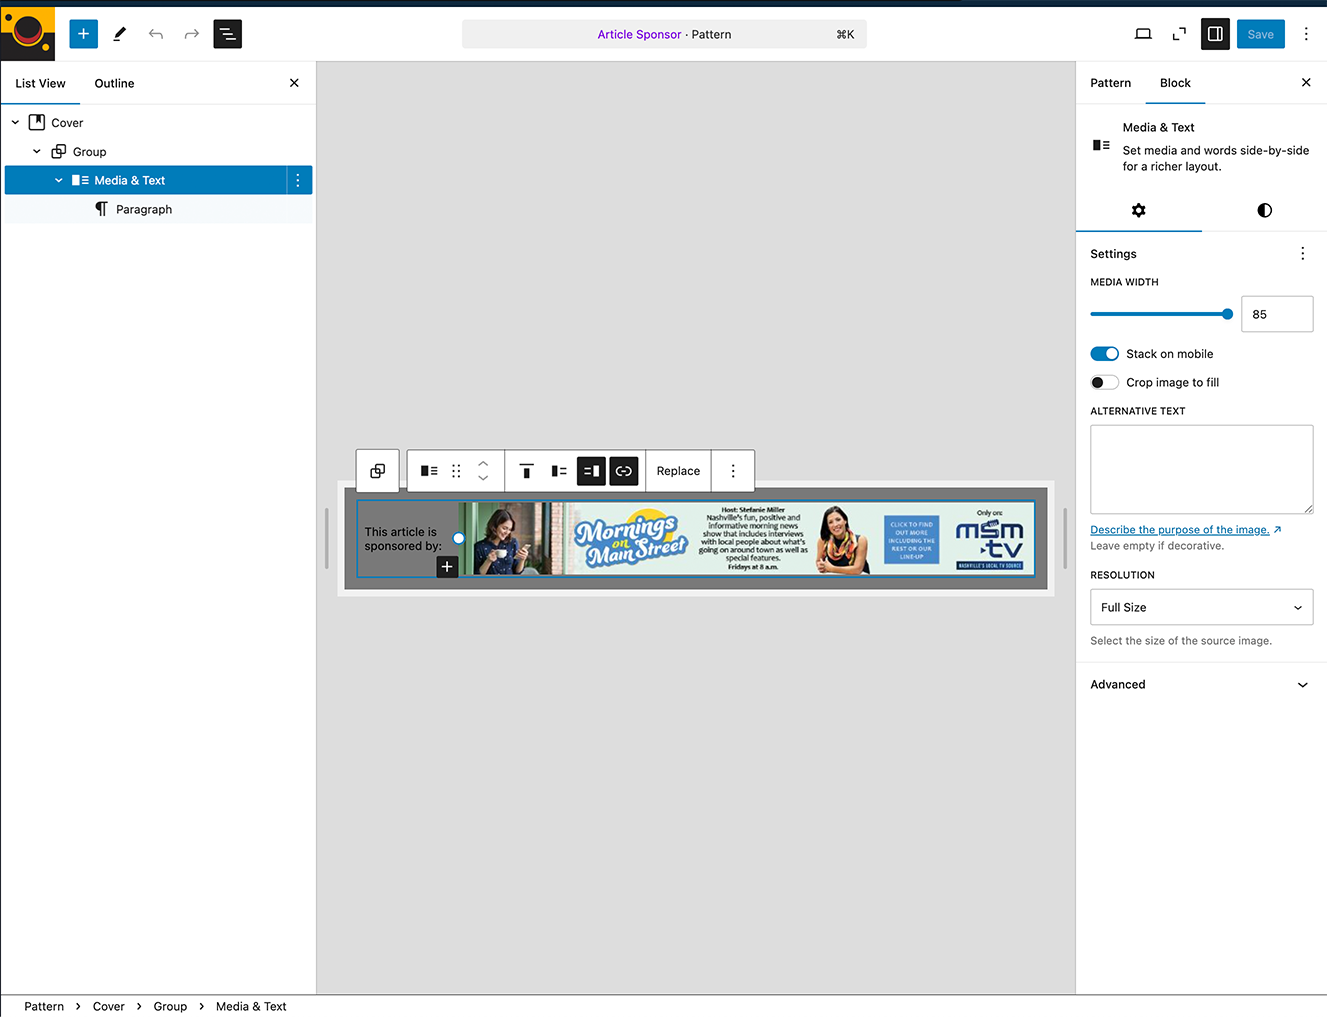
- Click the three-dot menu below the pattern thumbnail to open the pattern editor (this is basically a strip-down block editor, with access to all the normal blocks and settings that you will find when editing an article).
- Make any changes as you normally would when editing Blocks, then click the Save button at the top right to commit your updates.
- The changes will then be reflected in any instance of the Pattern placed in an Article or Post.
Tips and Tricks: Best Practices for Using Block Patterns Effectively
To maximize the benefits of WordPress Block Patterns, consider the following best practices. Always customize inserted patterns with your own unique content, including text, images, colors, and fonts, to ensure they align with your website’s branding and overall style. Avoid relying solely on the default styling provided by the patterns to maintain a distinctive online presence.
Make frequent use of the List View (accessible via the three stacked lines icon at the top-left of the editor) for efficient editing, especially when working with complex patterns that contain nested blocks like Columns or Groups. The List View provides a clear hierarchical structure, making it easier to navigate and select specific blocks for modification or rearrangement.
While many Block Patterns are designed to be responsive, it is always a good practice to ensure responsiveness across devices by previewing your pages and posts on different screen sizes (desktop, tablet, mobile). Adjust block settings or choose alternative patterns if necessary to guarantee optimal viewing experiences on all devices.
For better organization and easier manipulation of elements within a pattern, consider using the Group block to group related blocks together. This allows you to move and style the grouped blocks as a single unit, streamlining the editing process for more intricate layouts.

Recent Comments