Creating a category-driven Newsletter
|
Click play to LISTEN to the article below
|
The Newsletter Plugin included with Our-Hometown’s WordPress Publishing Platform is a powerful tool for creating attractive newsletters to easily promote your newest content to your subscribers.
While you’re probably familiar with the basic functionality of the plugin — such as using the Drag & Drop Composer to craft a totally custom newsletter out of widget-style blocks — there are a lot of different ways to distribute content to your readers, including targeting specific segments of your audience with content more tailored to their interests.
Today, we’re going to focus on that principle by Creating a Category-driven Newsletter.
If you’re already familiar with the Drag & Drop Composer, then creating a category-driven newsletter will be a piece of cake. However, there is a little setup involved before we can even begin working on the newsletter.
1. Creating your lists
First, we have to create Lists for each of the major sections of your newspaper that will have a dedicated newsletter.
From the Newsletter dashboard, navigate to List Building -> Lists.
You’ll see a list of, well, “Lists” that exist in your Newsletter system. In most cases, there will probably be a single list named “Newsletter List” or “Newsletter Subscribers” — something general. By default, any paid digital subscriber or free newsletter subscriber is automatically added to this “general” list and receives any new edition notices, breaking news updates, or other emails addressed to that list.

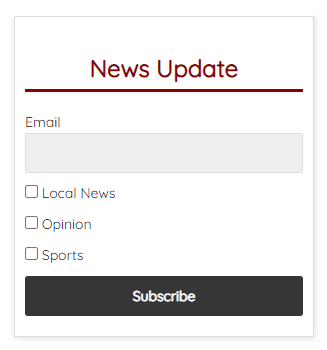
This is where you’ll want to add your extra lists, for example a “Sports” list for your sports enthusiasts, or an “Opinion” list for those interested in editorial and commentary-focused content. These are lists that users will be able to select when subscribing through your homepage newsletter widget, or by modifying their subscriber settings.
2. Adjusting your Widgets
You may have to adjust any existing Newsletter widgets on your website to allow for new subscribers to choose the new mailing lists when signing up.
Enter the Customize tool and navigate to your Newsletter widget. In most cases, you’ll find this in Widgets -> Default Sidebar or Widgets -> Front Page Right Sidebar.
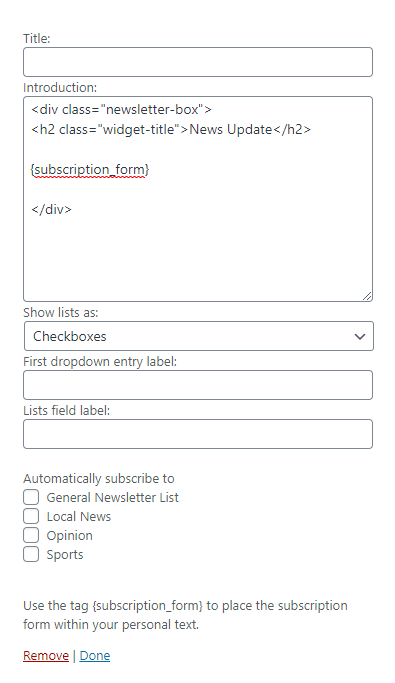
Make sure your widget is set to show lists as checkboxes for readers who want to subscribe to more than one list at once.
The widget settings also allow for your to choose which lists the subscriber should be added to automatically.
In most configurations, you’ll want to leave all of these options unchecked and let the reader choose themselves. However, if you have a dedicated Sports page on your website, you could add a newsletter widget specifically for the Sports mailing list by marking the “Sports” option here.
3. Creating your newsletter(s)
Now that we’ve laid the framework for a category-driven newsletter system, we’re ready to start creating a newsletter. We’re going to assume you’re at least somewhat familiar with using the Drag & Drop Composer, as well as using the Custom Post Type (CPT) Block within the composer to include a selection of Articles.
Create a new project and enter your subject, then fill out the structure of your newsletter by dragging blocks from the side panel. Use the CPT Block to place a block of Articles in your newsletter, making sure to adjust the block settings to only show Articles from the Sports category.
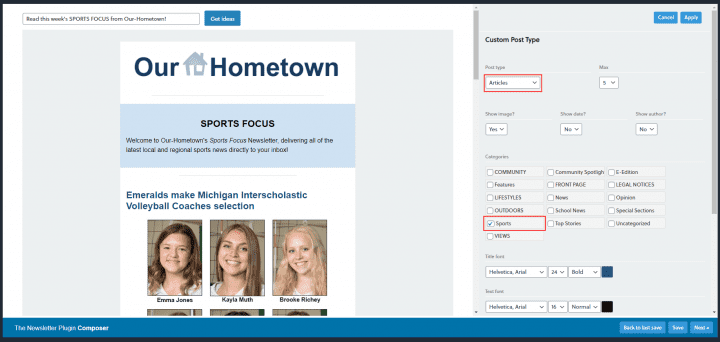
Your end result should be something like the above, featuring a CPT Block configured to show Articles from the selected category. Once you’re happy with the look and layout of your newsletter, it’s time to send it! Be sure to Save and click Next.
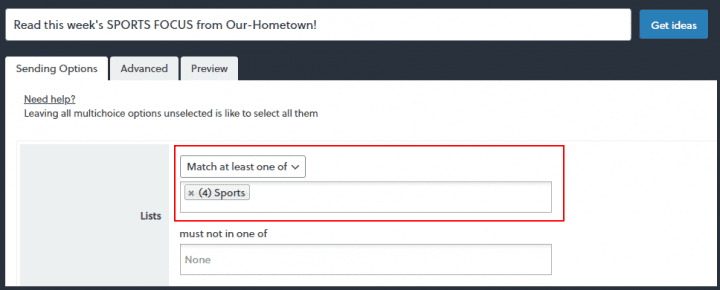
Now for the most important part: targeting the correct list! You need to make sure that your newsletter is only going to those users who have subscribed to the associated category; so make sure to enter the appropriate list on the targeting page before sending your newsletter.
That’s all there is to it! Now you know how to setup your Newsletter system for multiple mailing lists and category-driven newsletters!
You can repeat this process for each of your major categories, and can apply the same principles to create Automated Newsletters to save your staff the trouble of manually creating the newsletters each week.
Stay tuned for more tips from Our-Hometown!
- ← Scheduling changes in the Customize tool
- A Publisher Perspective on Google & Facebook paying for news →

Recent Comments