Migrating to Google Analytics 4
|
Click play to LISTEN to the article below
|

Google is sunsetting Universal Analytics on July 1, 2023.
The following are the steps to set up Google Analytics 4 (GA4) so that we can integrate it into your website.
NOTE: If you already have GA4 setup, we simply need your Google tag code for our engineering team to add to your website (skip to the last step!).
Create a Google Analytics Account
Skip to Creating a New Property if you already have one.
- Go to Admin, in the Account column, click Create Account.
- Provide an account name, we would suggest your website name plus GA4 to distinguish it from an old Universal Analytics account.
- Configure the data-sharing settings to control which data you share with Google.
- Click Next to add the first property to the account.
Create a New GA4 Property
- In Admin, look at the Account column to make sure that you’ve selected the right account.
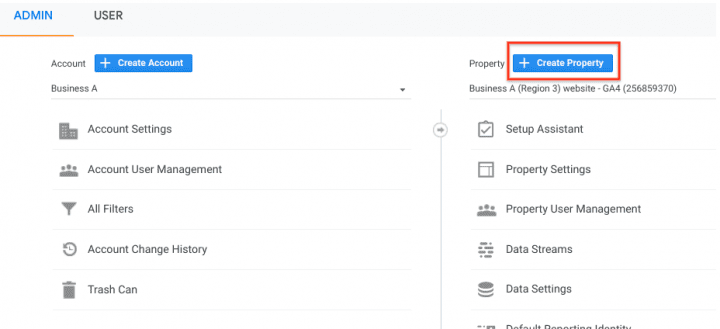
- Then, in the Property column, click Create Property.

- Enter a name for the property (e.g. “My Business, Inc website”) and select the reporting time zone and currency.
- Click Next. Select your industry category and business size.
- Click Create and accept the Analytics Terms of Service and the Data Processing Amendment.
Add a data stream
- In Admin, look at the Account column to make sure that you have your desired account selected. Then, look at the Property column to make sure that you have your desired property selected.
- In the Property column, click Data Streams > Add stream.
- For Our Hometown customers, click Web to add your site.

- Enter the URL of your primary website, e.g., “example.com”, and a Stream name, e.g. “Example, Inc. (web stream)”.
- Enable Enhanced measurement which automatically collects page views and other events.
- Click Create stream.
Find your Google tag code to provide to our engineering team
- Sign in to your Google Analytics account.
- Click Admin, at the bottom of the left sidebar.
- At the top of the Property column, select your property.
- In the Property column, click Data streams > Web.
- Click the data stream for your website.
- Under Google tag, click View tag instructions.
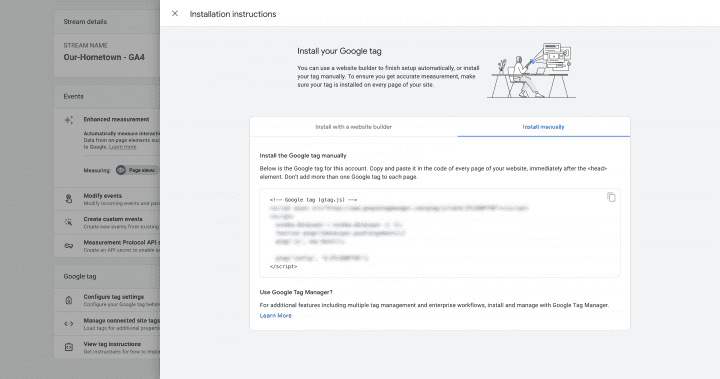
- On the Installation instructions page, select Install manually:
On the screen, you’ll see the JavaScript snippet for your account’s Google tag. Your Google tag is the entire section of code that appears, beginning with:
<!-- Google tag (gtag.js) -->
and ending with
</script>

Copy the entire code and email to ops@our-hometown.com with “Google Analytics 4 tag” in the subject and our engineering team will install it on your website.
Don’t hesitate to reach out via the same email or phone and our customer service team will assist you in migrating to Google Analytics 4!


Recent Comments