Publishing a Photo Gallery from Mobile
|
Click play to LISTEN to the article below
|
Last week, we touted how easy it is to Post an Article from a Mobile Phone thanks to some updates our engineers implemented in response to our annual New Features Survey, in which many of you mentioned the need for an improved mobile publishing experience. Now that you’ve been shown how to post a simple article, we’re going to take it a step further and show you how to create a Photo Gallery on your phone using the MaxGalleria plugin included with Our-Hometown’s WordPress CMS.
Photo Galleries are a popular feature of many newspaper websites, and are a great way to showcase any photos that don’t make it into the printed edition. Now, it is easier than ever to create a photo gallery and publish it on your website directly from your mobile device — cutting out the need to plug-in to a computer or e-mail photos to yourself in order to get them online.
Much like with publishing articles from your phone, the process of creating a photo gallery on a mobile device is nearly identical to what you would do on a computer. However, everything has been optimized to fit and display nicely on your device’s screen, and the ability to upload photos directly from your phone makes it a great tool for working “in the field.” If you’re on the scene of a large structure fire, you can take a series of photos, create a new photo gallery containing those photos, and embed the gallery into a “Breaking News” story on your website — all directly from your cell phone and in just a few minutes.
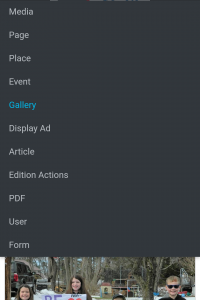
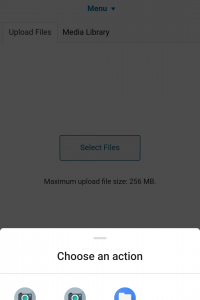
To Create a Gallery, simply click the Plus icon (+) at the top of your screen when logged in with your staff account, and select Gallery from the drop-down menu. When asked to choose which type of gallery you want to create, choose Image. Once you’ve entered a title for your new gallery, scroll down to the “Gallery” section and click the Add Images button. Touch over to the Upload Files tab and press the Select Files button. Once you’ve selected your photos, you’ll see that they now exist in your website’s “Media Library,” where you can highlight them and press Add To Gallery.
-

Click the Plus Icon (+) and choose "Gallery" to get started!
-

Choose "Images" to create a photo gallery.
-

Select your files and upload them to the media library before inserting to a gallery.
-

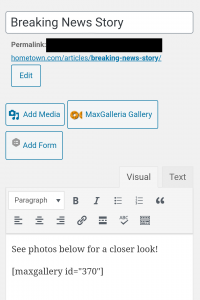
When editing an article on your phone, click the MaxGalleria Gallery button to insert an existing gallery, or create a new one.
-

Once you see that the gallery shortcode has been added to your article, you're ready to save or publish!
You can edit photo titles, captions and other gallery options much like you would from a standard desktop computer. Once you’re finished, go ahead and Publish your gallery. Now you just need to insert it into an article.
When editing or creating an article on your phone, click the MaxGalleria Gallery button above the main context box. You’ll be able to select from any of your published galleries to embed them directly into an article. You’ll also notice there is a Create Gallery button, which provides a quick way to transition from working on your article to creating the gallery in case you prefer to set up the article beforehand.
If you have any questions or need any further help creating photo galleries from your phone, please write to us at ops@our-hometown.com!
- ← Drive User Engagement with a “Reader’s Choice” Survey!
- Thriving in a Digital-only Landscape: Publisher Interview with Tom Lappas →


Recent Comments