Using the Gutenberg Block Editor
|
Click play to LISTEN to the article below
|
Our-Hometown recently upgraded our customer websites to the new WordPress 5 release, which includes a major change with the introduction of the Gutenberg Block Editor. The new Block Editor allows for the creation of modern media rich pages and articles using a visual “block” interface that lets you easily add and arrange a variety of different blocks, ranging from simple elements like Paragraphs or Images to more complex widgets like MaxGalleria Photo Galleries or GravityForm Submission Forms.
With the Block Editor, there is no need to know any HTML or other coding languages — you won’t even have to use shortcodes! You can create engaging multimedia content with very little technical knowledge just by placing blocks and arranging them to your liking. The change can be a bit jarring when you open the new editor for the first time, but you’ll quickly find that all of the options and features you’ve become accustomed to are still present. Once you take a few minutes to get used to it, you’ll see the unmatched potential that the tool provides.
1. Using the Block Editor
 When creating Articles, the Classic Editor will still be used by default, but you can harness the power of Gutenberg by navigating to the All Articles page on your Dashboard and using the drop-down arrow next to the Add New button to select the Block Editor option. This will begin creating a new article using the new block editor.
If you want to edit an existing Article using the new block editor, you can hover over the article’s title on the All Articles page and click the “Block Edit” link that appears below the title.
We felt it was important to allow our customers to continue using the classic editor for Articles so that they can adapt at their own pace, rather than being forced to learn how to use the new block editor during the middle of a busy publish week. However, future WordPress updates will focus on the block editor, and eventually the classic editor may be phased out entirely; so we do suggest taking the time to learn the ins & outs of the block editor.
When it comes to creating Pages, the block editor is enabled by default on all of our sites. This means whenever you Add or Edit a page, that page will open with the block editor. Existing pages will be converted to the block editor, and will feature Classic blocks or SiteOrigin Layout blocks that allow you to edit content using the previous methods if desired.
 2. Adjusting the Settings
One of the first things you’ll notice when using the new block editor is the Fullscreen Presentation. The added screen real estate can be crucial to creating an attractive page or article, but you can disable Fullscreen mode using the three-dot menu in the top right corner of the editor, and then unmarking the “Fullscreen mode” option. You can also use the Gear Icon to Show or Hide the Settings menu.
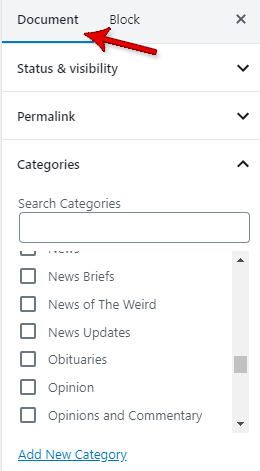
You’ll notice that the various options like Article Status, Categories, Broadcast Options, and Featured Images have been moved to the Document tab to the right of the editor on the Settings menu. This tab lists these different options as drop-down items, making them easier to find and quickly update on the fly. You can still drag and drop the different items to prioritize settings that you need to adjust more frequently.
Bylines, Subheadlines and SEO options appear below the editor by default, but these too can be moved around and interchanged with items on the menu.
The Publish, Update, and Preview buttons now appear across the top of the page, allowing you to quickly save your work at any time or launch a live preview without needing to interrupt your workflow or close out of fullscreen mode.
To Schedule an Article to publish in the future, click the Status & Visibility drop-down on the Document Settings menu. You should see that the Publish setting is set to “Immediately” by default. However, you can click the hyperlinked “Immediately” to open a scheduling menu that allows you to choose the date and time you’d like for your content to go live.
Now that you’re a little more familiar with the layout of the page, let’s place our first blocks!
3. Placing Blocks
As we’ve mentioned, the new Gutenberg editor has converted traditional story elements like paragraphs, headers, images, and quotes into their own blocks, allowing you to format articles in unique ways that make your content standout. In addition to these standard blocks, there are also ways to change the structure of the content by using columns or table blocks.
Several plugins include their own blocks that allow you to easily embed more complex features into your pages and articles, like photo galleries by MaxGalleria, forms by GravityForms, or polls from the WordPress Polls plugin.
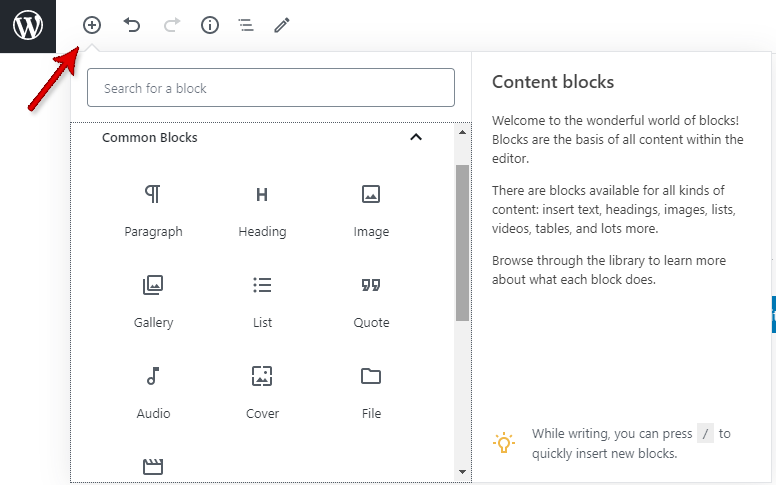
To place a new block, just click the + icon — either in the top left of the editor, or the one that appears next to whatever block you’re currently editing.
You can browse the vast selection of different blocks available for placement. When a block has been placed, you can adjust the settings for that block by clicking the Block tab on the Settings menu. This tab will always display the settings for the currently-selected block.
Once you’ve added a few blocks to your page, try re-arranging them by using the “Move Up” and “Move Down” options when highlighting the block.
When creating a page with text, it is handy to know that while typing in a Paragraph block, pressing the Enter key to begin a new paragraph will automatically create a new Paragraph block. You do not need to manually create a new block for each new paragraph.
That should cover the basics to using the new block editor. As with any new tool, the best way to learn how to use it is to simply try it out and experiment with it first-hand. WordPress has a great resource introducing the Gutenberg editor here, and be sure to watch the video included in this post to see some of the above talking points demonstrated.
If you have any questions, e-mail us at ops@our-hometown.com!
- ← Share an Article with your Mailing List in just one click!
- Asking for Help: Publisher Interview with Cecile Wehrman →


Recent Comments