Reverse Publishing Classifieds allows you to create and compile your Classified ads online, including ads submitted by customers through your website. When you’re ready, you can export the whole batch of ads for use in your print edition.
Of course, before you can export any ads, you must first create any ads that were not already submitted by customers.
Creating Your Ads Online
- From your WordPress Dashboard, find the link titled Classifieds and click Add New Classified.
- Enter a title for the ad, and enter the ad copy itself into the large textbox.
- Select a category and sub-category (if applicable) for your ad.
- Enter address & location information (if required)
- At the bottom of the right hand column is a box to upload attachments. Upload an image to display with your classified ad if you have one.
- Click “Publish” to publish the ad.
Exporting for Reverse Publishing
Once your ads are all published online, it is time to export the whole batch for placement in the print edition.
- From your WordPress Dashboard, find the link titled Classifieds Reverse Pub.
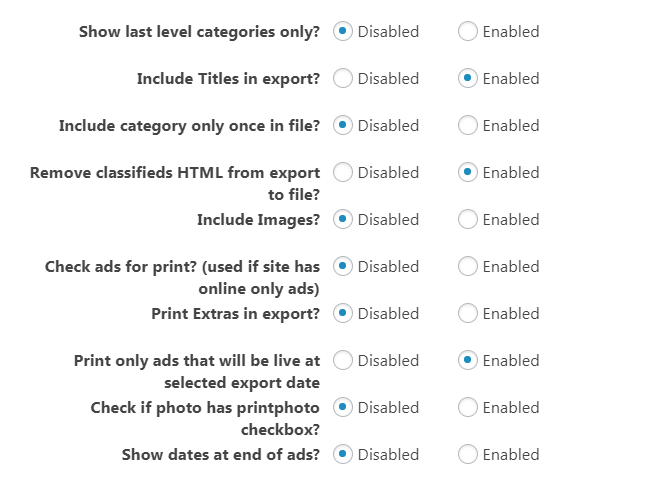
- Click the Settings tab to make sure your export settings are correct.

- Show Last Level Categories Only – Only show the category that the ad is assigned to, not the parent category.
- Includes Titles In Export – Determines whether to include titles with each ad, or just the ad content.
- Include Category Only Once In File – Determines whether a category is included only once per file, or if it is included for each individual ad.
- Include Images – Determines whether your export will include images.
- Check Ads For Print – If you offer different options for placing classifieds online vs in print, you can check this option to make sure that only ads designated for the Print Edition are exported.
- Print Extras In Export – Enabling this option will export “Extra” features, such as whether the ad includes bold text or a box.
- Print Only Ads That Will Be Live At Selected Export Date – Checking this box will make sure that only ads that will be active at the selected date are exported. (Excludes ads that are active at time of export, but will expire before the selected date)
- Check if Photo Has printphoto checkbox – Used in special cases for customers who have a “include photo in print” option.
- Show Dates at the End of Ads – Check this box to display the classified submission date at the end of the ad.
- Once you’ve verified your settings, click back to the Preview tab.
- Click the button to Generate Tab Classifieds.
- You should now see a preview of the included ads, with each ad listed by title along with the filename of any included images.
- Click Download Tab Zip Archive to download the export file.
