NextGen Gallery Pro is a powerful WordPress plugin that enhances the functionality of the NextGen Gallery plugin with eCommerce capabilities. In this tutorial series, we will explore the eCommerce features provided by NextGen Gallery Pro and learn how to use them effectively.
eCommerce Settings in NextGEN Pro
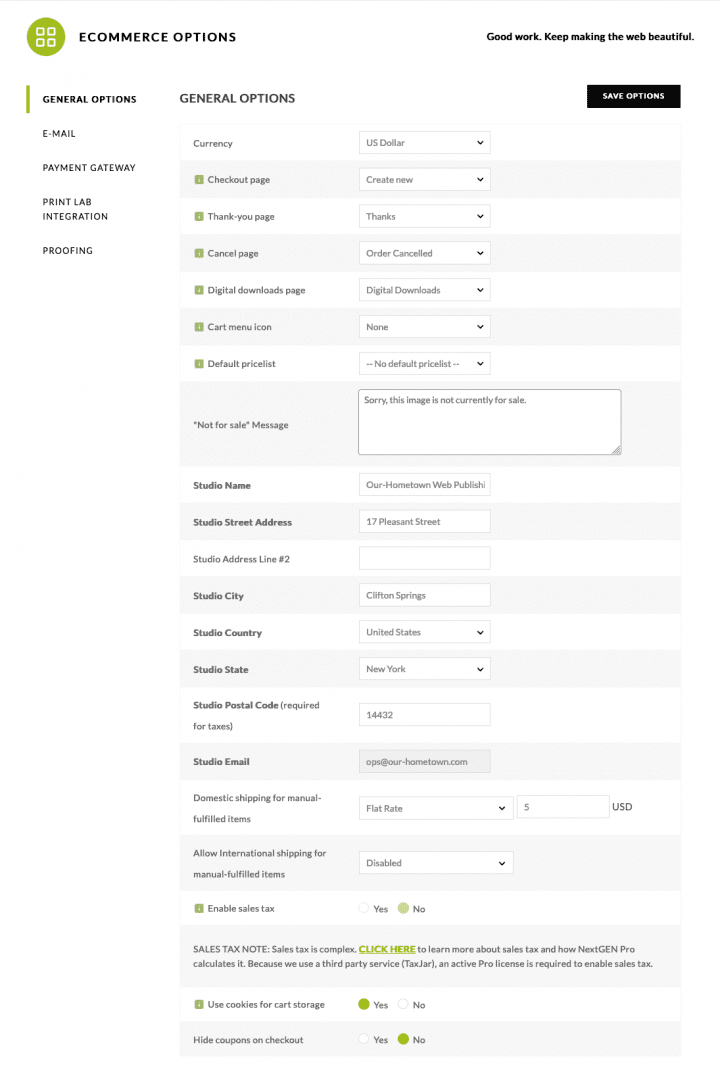
- Currency: Set your preferred currency for transactions.
- Default eCommerce Pages: These can be set by an existing page you have created and published by selecting it in the dropdown or if you leave the dropdown selection at 'Create new' when you save the eCommerce settings it will create those pages automatically for you.
- Cart Menu Icon: Determines the appearance of the Checkout page selected above when shown as an entry inside a menu. When a setting other than None is selected, the checkout page will be added to the first navigation menu registered by your theme.
- "Not for sale" Message: Set the message that will appear in place of the cart option for images marked not for sale.
- Studio Information: Fill in your studio's details. This includes the studio name, street address, city, country, state, zip or postal code (required for taxes and Automatic Fulfillment items), and email.
- Shipping: The cost of shipping is set at your pricelists under eCommerce Options > General Options. You can set it by 'Flat Rate' or 'Percentage'.
- Taxes: Enable sales tax is a flat rate that will apply for everyone regardless of their location (optional). The total tax is calculated from your studio zip code and the customer's zip code. You must have your studio information filled.
- Use Cookies for Cart Storage: Cookies are adequate for most customers but can only hold a limited number (around 30) of products due to browser limitations.
- Hide Coupons on Checkout: When turned on will hide the option to insert a coupon at checkout.
You have several payment options for checkout:
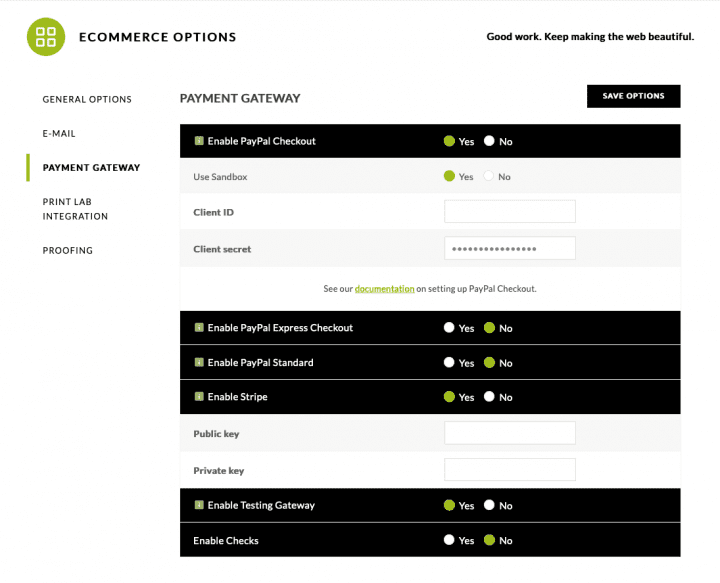 PayPal Checkout: PayPal offers multiple ways to link to PayPal for checkout. Historically, NextGEN Pro has offered PayPal Standard and PayPal Express Checkout. While these are still offered, PayPal is slowly phasing them out, and replacing them with PayPal Checkout.
Setting up PayPal Checkout for Payments:
- Navigate to Ecommerce > Ecommerce Options > Payment Gateway.
- Enable PayPal Checkout by clicking “Yes”.
- You’ll need a PayPal business account and a unique REST API key which consists of a Client ID and Client Secret.
- Retrieve these from the PayPal Developer Dashboard (https://developer.paypal.com/) under REST APIs in My Apps & Credentials.
- Paste your live Client ID and Client Secret into the associated fields in NextGEN Pro and save your settings. You can also opt to use the PayPal Sandbox for testing1.
Setting up Stripe for Payments:
For Stripe, you’ll need a public key and a private key. More information on Stripe setup can be found on their website, including signup instructions. You can grab your Stripe API Key from there. Stripe does not provide a sandbox option within the settings. If you want to test the checkout process, you will need to set this up manually following the instructions on their website.
Using the Testing Gateway:
When the Testing Gateway is enabled, it simulates the process of a payment gateway but doesn't actually charge any money. This means you can go through the entire process of adding items to the cart, filling out customer information, and completing the checkout process without any real transactions taking place.
It's important to note that the Testing Gateway should be disabled when your site is live and you're ready to start accepting real payments. It's only meant for testing purposes and not for actual eCommerce transactions.
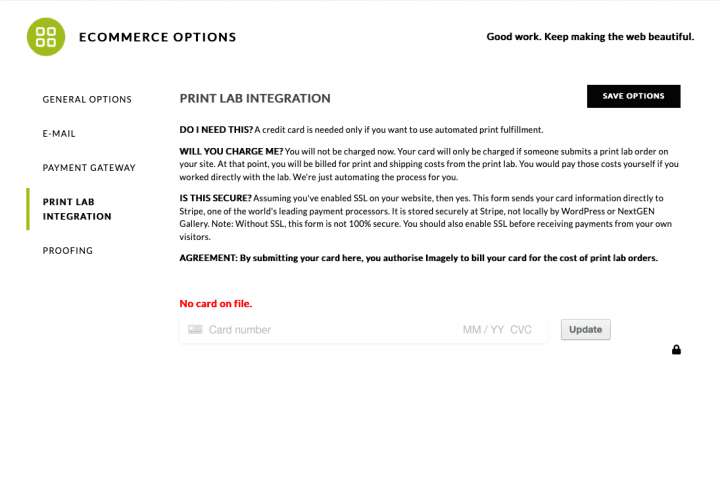 If you wish to process lab fulfilled orders, you must provide a credit card that that will be billed for the cost of goods for orders fulfilled by the print lab. When a customer purchases a print, the cost of prints will be immediately charged to this credit card and order submitted to WHCC to be fulfilled.
Proofing allows your clients to select which images they'd like you to process and set up for ordering.
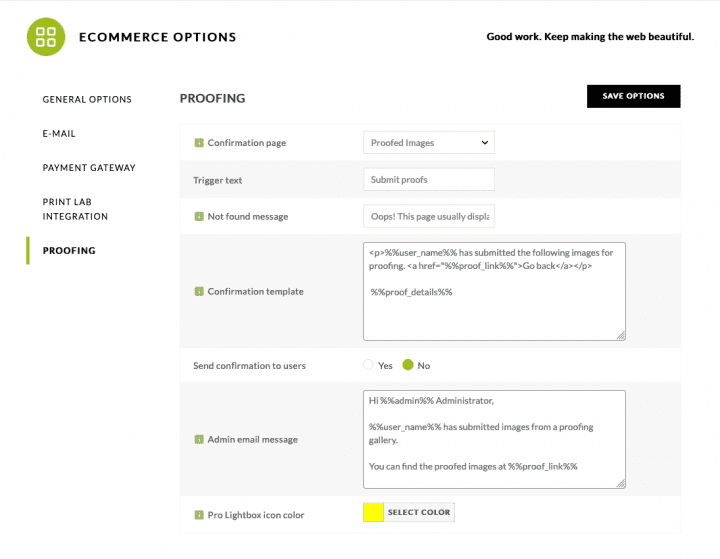
- Set Confirmation Page: If you already have a confirmation page, you can select it from the dropdown, otherwise leaving the selection to Create New the plugin will automatically generate the page.
- Customize Trigger Text: This is the text for the submit button under your proofing gallery. By default, it says 'Submit Proofs'.
- Set Email Confirmation: Optionally, you can choose to send a confirmation email to your client after they submit their images. This serves as a 'receipt' and confirmation of successful submission.
- Choose Pro Lightbox Icon Color: Select the color for the star icon that your clients click when selecting their images.
Remember to click 'Save' after making your changes.

