Benefits of Promotional Newsletter Inserts
-
Increased Visibility: By including promotional newsletter inserts in your MemberPress newsletters, you can increase the visibility of your promotions to your members. This can help to increase the number of people who see your offers and may be interested in taking advantage of them.
-
Targeted Marketing: MemberPress allows you to segment your members based on various criteria such as membership level, subscription status, and more. By using promotional newsletter inserts, you can target specific segments of your member base with offers that are most relevant to them.
-
Higher Engagement: Promotional newsletter inserts can be designed to be visually appealing and attention-grabbing, which can lead to higher engagement rates from your members. This can result in more clicks, more conversions, and ultimately more revenue for your business.
-
Cost-Effective: Compared to other forms of advertising such as paid social media ads or print ads, promotional newsletter inserts can be a cost-effective way to promote your offers to your members. This is especially true if you already have a newsletter program in place and are able to create the inserts in-house.
-
Easy to Implement: MemberPress makes it easy to create and send newsletters to your members, and including promotional newsletter inserts is a straightforward process. This means that you can quickly and easily add promotional content to your newsletters without requiring any technical expertise.
Using Promotional Newsletter Inserts in MemberPress can help you increase the effectiveness of your marketing campaigns, target your promotions more effectively, and drive more revenue to your website.
In this example our customer has created a promotion to offer discounts to customers whose subscription has recently expired and wants it to be included with every newsletter during the promo period.
Before setting up a Promotional Newsletter Insert, we need to create a Coupon Code to be shared with the newsletter recipients for use when purchasing a subscription on your website.
From your WordPress Dashboard, navigate to Memberpress then Coupons.
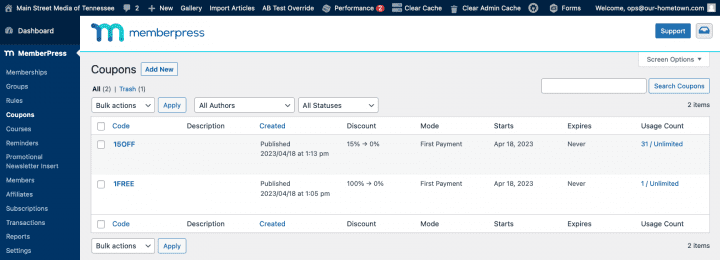
This will take you to the listing of any coupons already present including columns showing the discount, discount mode, start and end dates, etc. To create a new coupon click the Add New Button.
By default, the new coupon code will be a randomly generated string of numbers and letters, but you can edit the code to whatever you want — just don’t include any spaces or special characters. Most customers prefer to use something easy for their readers to remember. This is the code that you will eventually deliver to your readers via email newsletters, social media, print, or however you choose to advertise your promotional discount.
In this example the customer is offering 15% off the first payment for monthly memberships and the first month free for annual memberships.
Under the Coupon Options, there are a few settings that need to be configured to determine how your coupon should work.
Discount: You can enter either a dollar amount or a percentage to be discounted when using the standard mode as described below. The discount for the other modes is specified below the mode selection menu.
Discount Mode: There are three discount modes:
- Standard – A standard discount of the amount/percentage entered above. If applied to a recurring subscription, this discount will apply to each payment made towards that subscription.
- First Payment Only – Discounts the amount/percentage entered below, but only on the First Payment of a recurring, auto-renewing membership.
- Trial Period Override – Discounts the amount/percentage entered below, but only on the Trial Period of a recurring, auto-renewing membership. (Note the membership does not need to have a trial period in order for this to work. The benefit of using this setting over the First Payment Only option is that you can set the amount of days that the trial period should last, whereas the first payment can only be for the normal duration of the automatically recurring subscription.)
Usage Count: You can enter a maximum number of uses if you want to limit this offer to the first “X” amount of people to use the code, or if you have a code that you only want to give to one specific customer.
You can allow customers to use the coupon code on Subscription Upgrades or Downgrades by ticking that checkbox.
If you wish you can specify a start date for the coupon by ticking the Schedule Coupon Start checkbox and entering the desired date.
You can similarly schedule a coupon to Expire on a selected date at midnight after which it will no longer be valid.
Finally, Select Which Memberships to Apply the Coupon to.
With a Coupon Code created, let’s move on to setting up the Promotional Newsletter Insert.
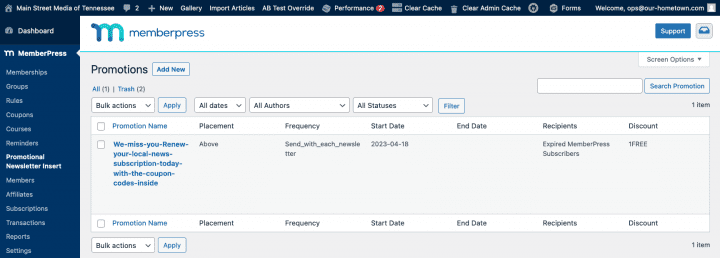
Navigate to Memberpress then Promotional Newsletter Inserts. This will take you to the listing of all your promotions with columns indicating placement, frequency, start and end dates, recipients and which discount coupon is being used. To create a new insert click the Add New Button.
Enter the title of your Insert, and edit your promotional message as desired in the textbox — just be sure NOT TO DELETE the “promo-coupon” text placeholder, as that serves as the variable where the coupon code you select later will display.
The insert message can contain any number of elements such as photos or graphics in addition to the text. Also note in this instance that the publisher is including TWO codes and as such is not using the coupon placeholder instead placing them manually.
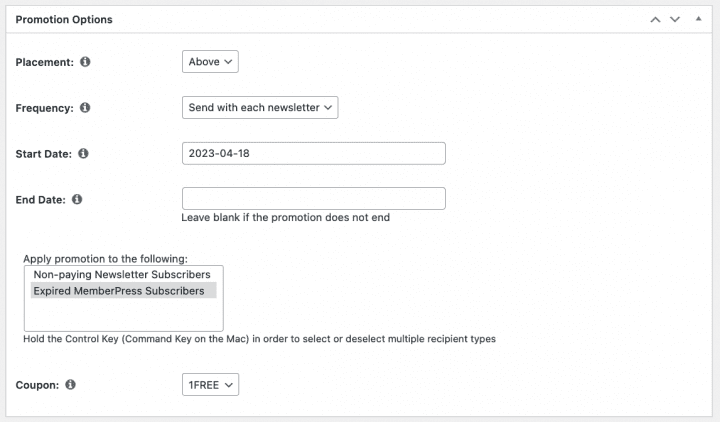
Once your message is complete, scroll down to the Promotion Options beneath the main textbox.
Here you can choose the placement of your Insert in relation to your regular newsletter: Above or Below. Above would display the promo at the top of the newsletter, while Below would display it at the bottom of the message.
Next, select the Frequency. The Frequency determines how often the promo should be included in your newsletters: Send with each newsletter, Weekly, Monthly, Quarterly, or Annually.
If you choose Send with each newsletter, every newsletter will include the insert until the promotion ends. If you choose Weekly, the insert will be included with the newsletter once per week until the promotion ends, and so on.
Next, you can enter a Start Date and End Date, which will determine the period that the system will attach the Insert to outgoing Newsletters. This allows you to schedule promotions in advance, in case you had one promotion planned for summer and another one for the fall.
You will need to specify which groups of members the promotion should apply to: Non-Paying Newsletter Subscribers, Expired MemberPress Subscribers, or Both.
The differences here are important. A non-paying newsletter subscriber could just be any visitor who has subscribed to your newsletter, while expired MemberPress Subscribers are former subscribers whose subscriptions have expired and were not renewed.
If you were running a campaign aimed only at past subscribers, you wouldn’t want to include non-paying newsletter subscribers. However, a generic promotion aimed at any non-subscribers would make sense to be delivered to both groups.
Finally select the Coupon Code that should be included with this promotion. The dropdown list will contain all the coupons created in MemberPress, so choose the appropriate one for the new insert.
Once you are satisfied with the insert click the Publish button to finish creating your insert. Note also that the Publish panel has similar status and visibility options as articles, if the need arises.
When your Promotional Insert is Published, it will begin attaching itself to e-mails automatically on the Start Date you’ve entered.


