Setting up Auto Renewing Memberships in MemberPress
Setting up Auto Renewals, also known as Automatically Recurring Memberships, in Memberpress is quite easy and can be achieved in just a few minutes. There are a few important rules you need to follow:
- Never edit an existing “One-Time” membership to update it to an Auto Renewal membership, or vice versa. You will want to start fresh and create a brand new auto renewing membership to avoid conflicts with existing subscribers.
- While you generally should not ever delete a user anyway, you definitely should never delete a user who is subscribed to an automatically renewing membership. This is not the correct way to cancel a subscription. In this scenario, the user would lose his account, but would still be an “active subscriber” and be charged each billing cycle.
- You must be using one of our supported Payment Gateways and have all IPN, Webhook, or ARB settings configured properly: Stripe, Authorize.net, or PayPal
 With that in mind, let’s get started creating our Automatically Recurring Membership.
- From your WordPress Dashboard, find the tab titled Memberpress and choose the sub-menu item titled Memberships.
- From this list of Memberships, click the “Add New” button.
- Enter the Membership title. In this case, I’ll name it “Montly Auto-Renewing Membership”
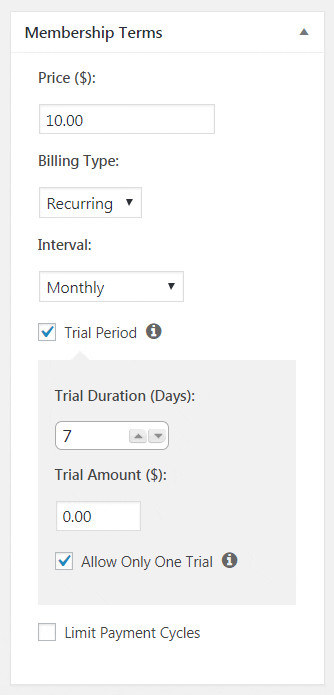
- Fill out the details in the Membership Terms box.
- Set the price that the customer should be charged each billing cycle.
- Set the Billing Type to Recurring.
- Set the Interval to your intended billing cycle. For this example, I’ve chosen the Monthly interval, but you can choose any of the following: Monthly, Yearly, Weekly, Every 3 Months, Every 6 Months, or create a Custom interval.
You’ll notice a couple of other options at the bottom of the Membership Terms box.
First, you’ll see a checkbox for a Trial Period. You can use this to give your members either a free or discounted trial period before their full-price membership begins. When you enable the Trial Period, you’re asked to enter a duration for the trial and the price of the trial. The customer will pay the trial free up front (if one is entered), but can cancel their membership prior to the end of the trial period if they decide they no longer want to subscribe. (Note: Trial must be entered according to days, but if the number entered is a multiple of 7 it will show up as weeks, multiples of 30 will show up as months and multiples of 365 will show up as years. If the number is greater than 14 and is not divisible by either 7, 30, or 365 there is a chance of having issues with your payment gateway processing the transaction correctly.)
In my example, I’ve set up the membership with a free 7-day trial period.
The second option is Limit Payment Cycles, which when checked allows you set a maximum amount of payment cycles for a customer. Once the max number of payment cycles has been reached by a customer, their access can be expired (or extended to a “Lifetime” membership). While this feature generally is not be used on our websites, it could be used in a scenario where you want to offer the auto-renewing membership for a short period. For example, you could set up a “6 Month Auto-Renewal Membership” that only auto-renews for 6 months, and then requires the user to re-subscribe.
Once you’ve configured your Membership Terms, you can finish filling out the rest of the details for this membership as you normally would, including the Registration, Permissions, Price Box and Advanced Tabs.
Publish the membership when you are ready.
